Plug-in API for AP Essentials Connect
The Plug-in API exposes a number of different events that a plug-in can subscribe to in order to enhance the process in various ways.
The Tungsten AP Essentials Connect Plug-in API allows partners to write plug-ins that execute in Tungsten AP Essentials Connect, on premise at the site of the customer. The Plug-in API exposes a number of different events that a plug-in can subscribe to in order to enhance the process in various ways.
Plug-ins can be used in a number of scenarios, from simple tasks such as renaming files, to full integrations to new target systems.
Plug-in essentials
Plug-ins are created using the AP Essentials Connect Plug-in SDK. A plug-in is a .NET 4.0 class library assembly (DLL) with references to the Plug-in API.
When a plug-in has been built, the main DLL must be signed using a code certificate. All files needed by the plug-in should then be compressed into a single ZIP file and uploaded to Tungsten AP Essentials as a resource, using the Tungsten AP Essentials Admin Center.
Once uploaded, the plug-in can be selected as part of the target system configuration for a specific customer. When the customer runs through the configuration wizard of Tungsten AP Essentials (on premise) they will be informed about the usage of the plug-in and have to accept this in order to continue.
Download the SDK and samples
You can download the SDK and samples here.
Relationship to the Tungsten AP Essentials API
The Plug-in API is a simplification of the Tungsten AP Essentials API. In many cases, developing a plug-in is sufficient to meet integration needs. When using plug-ins, the infrastructure around it, such as the installation of AP Essentials Connect, Windows Service, automatic updates, authentication, scheduling etc, are handled for you.
If the Plug-in API does not meet your needs, you can create a more advanced integration using the Tungsten AP Essentials API.
Plug-in API
The Plug-in API consists of a few interfaces and classes that are contained in ReadSoft.Connect.Plug-in.dll, which is part of the plug-in SDK.
IPlugin
For a plug-in to be valid, the plug-in DLL must contain a class that implements the IPlugin interface and also exports that same type as demonstrated in the example scenarios below.
When a plug-in is loaded, the Initialize method is invoked and the plug-in can set things up as well as subscribe to different events. Each event comes with a specialized event handler.
Plug-ins are executed in AP Essentials Connect, which runs in the background as a Windows Service. Therefore, you cannot display any UI elements (such as message boxes) that might block the AP Essentials Connect process. Instead, messages must be written to log files or the Windows Event Log.
public interface IPlugin

  {

    void Initialize(IApplication app);

    Guid Id { get; }

  }
IApplication
IApplication is the main application interface that plug-ins use to subscribe to events and get various information.
The GetProgramFolder method returns the path to the folder where the AP Essentials Connect configuration is located (default location: C:\Program Files (x86)\Tungsten\AP Essentials Connect\).
 public interface IApplication

  {

    string GetProgramFolder();

    event EventHandler<DocumentDownloadStartEventArgs> DocumentDownloadStart;

    event EventHandler<ImageDownloadCompleteEventArgs> ImageDownloadComplete;

    event EventHandler<FileDownloadCompleteEventArgs> FileDownloadComplete;

    event EventHandler<DocumentDownloadCompleteEventArgs> DocumentDownloadComplete;

    event EventHandler<MasterDataRequestEventArgs> MasterDataRequest;

  }
Events
Plug-ins subscribe to events to execute code when an event occurs, such as when a file has been downloaded.
Some of the events require references to other DLLs besides ReadSoft.Connect.Plug-in.dll. The other DLLs can be found in the Tungsten AP Essentials SDK.
Some event arguments provide a connection to the Tungsten AP Essentials API (ServiceConnection property). This connection can be used to communicate further with the Tungsten AP Essentials API in case more information is needed. Knowledge of the Tungsten AP Essentials API and SDK is required for such tasks. The same events also provide information allowing the plug-in to know if the connection was made using customer or partner credentials (IsCustomerLevelConnection property).
Event flow chart
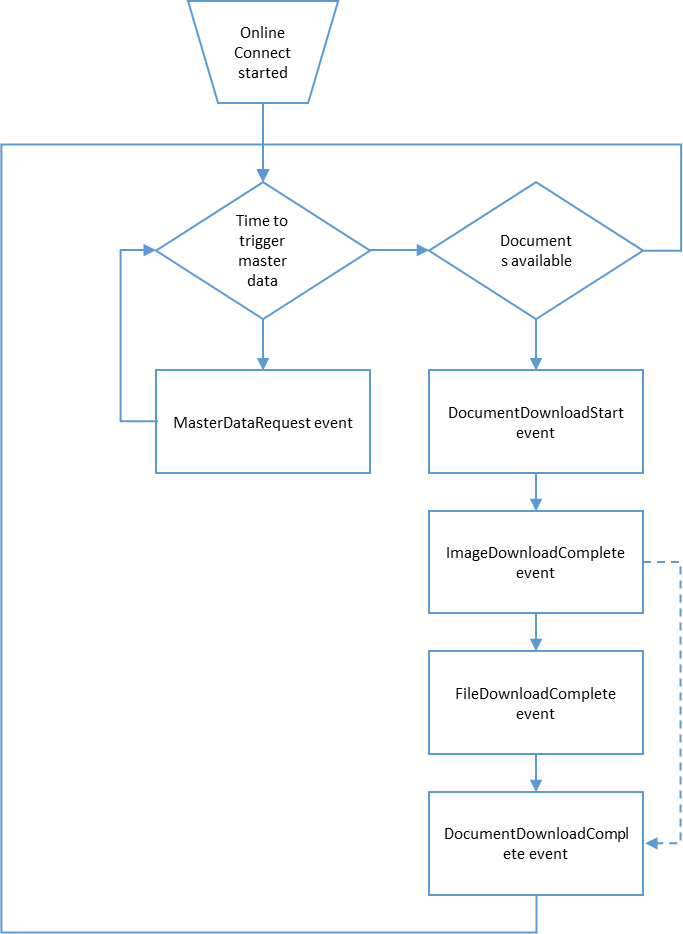
DocumentDownloadStart event
This event occurs when a document has been processed in Tungsten AP Essentials and is about to be downloaded by AP Essentials Connect. The event arguments contain brief information about the document (DocumentReference) as well as connection information. It also has a property (SkipXmlDownload) that allows the plug-in to control if the XML file for the document should be downloaded or not. This can be useful in situations where only the image is needed, or the document data is fetched by the plug-in code instead.
public class DocumentDownloadStartEventArgs : EventArgs

  {

    public bool SkipXmlDownload { get; set; }

    public DocumentReference DocumentReference { get; set; }

    public ClientConfiguration ServiceConnection { get; set; }

    public bool IsCustomerLevelConnection { get; set; }

  }
ImageDownloadComplete event
This event occurs when a document image has been downloaded and saved to a local file (in the folder selected in the AP Essentials Connect wizard configuration). It can, for example, be used to do image manipulation.
public class ImageDownloadCompleteEventArgs : EventArgs

  {

    public string ImageFilePath { get; set; }

  }
FileDownloadComplete event
This event occurs when the document XML and image have been downloaded and saved to local files. It can be used to manipulate the XML content and/or image, or to rename/move files.
public class FileDownloadCompleteEventArgs : EventArgs

  {

    public string XmlFilePath { get; set; }

    public string ImageFilePath { get; set; }

  }
DocumentDownloadComplete event
This event occurs when the document processing (downloading of files) is complete, from AP Essentials Connect's point of view. You can use this event, for example, to integrate data with external systems. The argument class contains a Result property that can be used to give more details to Tungsten AP Essentials about the document process result. For example, if the integration fails for any reason, the error message can be set in the Result, and the status can be set to Failed. Doing so would send the document back to Tungsten AP Essentials, where an operator can review the message and take appropriate actions. In the Plug-in SDK, there is a sample that shows a full integration solution.
public class DocumentDownloadCompleteEventArgs : EventArgs

  {

    public string XmlFilePath { get; set; }

    public string ImageFilePath { get; set; }

    public DocumentReference DocumentReference { get; set; }

    public ClientConfiguration ServiceConnection { get; set; }

    public OutputResult Result { get; set; }

    public bool IsCustomerLevelConnection { get; set; }

  }
MasterDataRequest event
Most events are triggered by each document. However, this event is triggered when AP Essentials Connect determines that it is time to provide master data from your external system to Tungsten AP Essentials. By default, the event is triggered every 12 hours, and when the user presses Synchronize in AP Essentials Connect.
Use the connection data provided in the event arguments to connect to the Tungsten AP Essentials API and upload the master data needed by your integration. Tungsten AP Essentials API knowledge is required. See the Plug-in SDK sample for more details on how this can be used.
public class MasterDataRequestEventArgs : EventArgs

  {

    public ClientConfiguration ServiceConnection { get; set; }

    public bool IsCustomerLevelConnection { get; set; }

  }
Scenarios
Create a Hello World plug-in
This scenario demonstrates how to create a plug-in and subscribe to an event. It also shows how to create a custom debug log file for your plug-in.
- In Visual Studio (or similar), create a new project for a .NET 4.0 class library named MyTargetSystemPlug-in.
- Add a reference to ReadSoft.Connect.Plug-in.dll (part of the plug-in SDK).
-
Rename Class1.cs to MyPlugin.cs and change to the following code:
using System; using System.ComponentModel.Composition; using System.IO; using ReadSoft.Connect.Plugin; namespace MyTargetSystemPlugin { [Export(typeof(IPlugin))] public class MyPlugin : IPlugin { private string _logFilePath; public Guid Id { // Unique ID for your plugin, create a new one if copying this sample. get { return Guid.Parse("EB67638B-308F-4627-A927-0D9743DC99AC"); } } public void Initialize(IApplication app) { _logFilePath = Path.Combine(app.GetProgramFolder(),"myplugin_log.txt"); app.FileDownloadComplete += AppOnFileDownloadComplete; } private void AppOnFileDownloadComplete(object sender, FileDownloadCompleteEventArgs args) { LogDebug("Hello world! I just downloaded this guy: " + args.XmlFilePath); } private void LogDebug(string message) { message = string.Format("{0} – {1}\n", DateTime.Now, message); File.WriteAllText(_logFilePath, message); } } } - Compile and publish the plug-in as described in the Publishing section below.
- Process a document in Tungsten AP Essentials using a customer where the plug-in is activated.
- After the document is processed by AP Essentials Connect, the plug-in log file "C:\Program Files (x86)\Tungsten\AP Essentials Connect\myplug-in_log.txt" contains the greeting message from the code.
Rename files
In this scenario, you rename the XML and image files downloaded using the invoice number and supplier name from the document.
- Set up your project according to the Hello World scenario.
-
In the event handler for FileDownloadComplete, get the invoice number and
supplier name from the downloaded XML. If you use Online XML v2.0, you can achieve
this using these XPath values:
var downloadedXml = File.ReadAllText(args.XmlFilePath, Encoding.UTF8); var xmlDoc = XDocument.Parse(File.ReadAllText()); var invoiceNumber = string.Format("{0}", xmlDoc.XPathSelectElement("/Batches/Batch/Documents/Document/HeaderFields/HeaderField[Type='invoicenumber']/Text").Value); var supplierName = string.Format("{0}", xmlDoc.XPathSelectElement("/Batches/Batch/Documents/Document/Parties/Party[Type='supplier']/Name").Value); -
Rename the XML file and image file using the paths available in
FileDownloadCompleteEventArgs.
var newFileName = Path.Combine(Path.GetDirectory(args.XmlFilePath), string.Format("{0}_{1}", supplierName, invoiceNumber)) + ".xml";

File.Copy(args.XmlFilePath, newFileName)

...
Manipulate images
In this scenario, you manipulate the downloaded image. Assume you want to split a multi-TIF file into several files (one per page). Or maybe you want to convert the image to a format that is not supported by Tungsten AP Essentials.
- Set up your project according to the Hello World scenario.
- In the event handler, ImageDownloadComplete, the "args" argument contains the path to the downloaded document image (PDF or multi-TIF, depending on the configuration you have done in Tungsten AP Essentials). Process the image file as needed.
Create a full target system integration
In the Plug-in SDK, there is a sample that describes how a full integration to a new target system can be implemented. This sample uses several events to get data and image from the document, as well as uploading master data.
Publish a plug-in
The following steps are needed to publish and activate your plug-in to be used for a specific customer, or for testing.
- Compile your plug-in project.
-
Using a code signing certificate, sign the plug-in DLL.
If you do not have such a certificate, you can create a test certificate in Visual Studio: Create a new Windows Forms App project, open project properties, go to the Signing tab, select Sign the ClickOnce manifest and then select Create Test Certificate. After you copy the resulting PFX file to your plugin project folder, you can delete the Windows form app project.
You can use SignTool.exe from the Microsoft Windows Kit to perform the actual signing. To validate that the plug-in DLL is signed, right-click the DLL and choose Properties. If the dialog contains a Digital Signatures tab with a signature in the list, the DLL is signed correctly. - Compress all plug-in files (DLLs) into a ZIP file. The name of the ZIP file is used as the the plug-in.
-
Upload the ZIP file to the Resources view in Tungsten AP EssentialsAdmin
Center on the partner level. The contents of the ZIP file cannot exceed 50 MB in size.
If your plug-in is not signed, you will get an error message.
- In Tungsten AP Essentials Admin Center, navigate to the customer you would like to activate the plug-in for and choose XML locally as the target system.
- Specify your newly uploaded plug-in in the AP Essentials Connect plug-in setting and save your changes.
- In AP Essentials Connect, run the configuration wizard. When prompted to allow usage of the new plug-in, accept the usage and finalize the configuration wizard.
Plug-in configuration
Currently, there is no way for plug-ins to display a configuration UI in AP Essentials Connect or the Tungsten AP Essentials Admin Center. One way of providing configurable settings for your plug-in is to serialize/de-serialize your configuration object to an XML file located in the same folder that AP Essentials Connect stores its configuration. In your plug-in code, you can retrieve this folder path from the app object through the Initialize method. See the Plug-in SDK sample for an example that demonstrates how to do this.
Debug a plug-in
You can debug your plug-in by attaching Visual Studio to the AP Essentials Connect Windows service process:
- In debug mode, build your plug-in.
- Publish the plug-in and run the AP Essentials Connect configuration wizard locally on your computer to make sure the latest version of the plug-in is downloaded by AP Essentials Connect.
- In Visual Studio, select Debug/Attach to Process and attach to the ReadSoft.Connect.Host.exe process.
- Make sure you have breakpoints set up in your code, and then process a document in Tungsten AP Essentials.