Configure SAP S/4HANA Cloud ES for use with Tungsten AP Essentials
Before you can use the SAP S/4HANA Cloud ES integration with Tungsten AP Essentials, perform these steps:
-
Enable OData services.
-
Configure custom CDS views.
-
Define a communication system.
-
Adjust the Maintain Trusted Network Zone settings in SAP S/4HANA Cloud ES (optional).
-
Adjust settings for creating purchase orders for 3-way matching (optional)
These procedures serve as a basic guide for configuring SAP S/4HANA Cloud ES for use with Tungsten AP Essentials and require knowledge of SAP S/4HANA Cloud ES. Refer to SAP S/4HANA Cloud ES documentation for more information concerning SAP S/4HANA Cloud ES.
Enable OData services
For AP Essentials to communicate with SAP, you must enable the following OData services in SAP S/4HANA:
-
API_SUPPLIERINVOICE_PROCESS_SRV
-
API_CV_ATTACHMENT_SRV
-
API_BUSINESS_PARTNER
-
API_COMPANYCODE_SRV
-
API_ENTERPRISE_PROJECT_SRV
-
API_MATERIAL_DOCUMENT_SRV
-
API_SERVICE_ENTRY_SHEET_SRV
-
API_PURCHASEORDER_2
Configure custom CDS views
Custom CDS views are required to import master data from SAP S/4HANA Cloud ES. Creating a CDS view combines information from different tables and reduces the number of data transfers. To configure a custom CDS, you must first create the CDS view, and then make it available to the integration via a communication scenario and a communication arrangement. After you complete these procedures, you specify the CDS APIs and resources in the target system settings.
-
Create CDS views for purchase orders, company tax procedures, country tax codes, tax types, and company general ledger accounts.
-
Create a communication scenario for each CDS view.
-
Create a communication arrangement for the CDS views.
-
Specify the CDS view APIs and resources in the target system settings
Note: Records in the CDS views can contain data in different languages. To determine the language, the integration uses the buyer language of the company code (CompanyCode field) in SAP. If the company code language is not specified for a particular tax code, English is used.
Create a CDS view for purchase orders
When you create the CDS view for purchase orders, you add these data sources and join them:
-
I_PurchaseOrderItemAPI01
-
I_PurchaseOrderHistoryAPI01
- In SAP, navigate to Custom CDS Views and select Create.
-
Use the dialog that appears to specify a Label and Name.
The Name must start with "YY1_". For example: YY1_POWithHistory
You cannot modify the name later.
- Select External API in the Scenario setting.
- Select Create.
-
In the view that appears, select I_PurchaseOrderItemAPI01 to include the PO history as
a data source.
The data source appears in the Custom CDS View Details view.
-
Select Add > Associated Data Source and use the
dialog that appears to add I_PurchaseOrderHistoryAPI01 as a data source.
Both data sources now appear in the Custom CDS View Details view.
-
Select Join Condition and
use the dialog that appears to join PurchaseOrderItem with
I_PurchaseOrderItemAPI01.PurchaseOrderItem.
Likewise, join PurchaseOrder
with I_PurchaseOrderItemAPI01.PurchaseOrder.
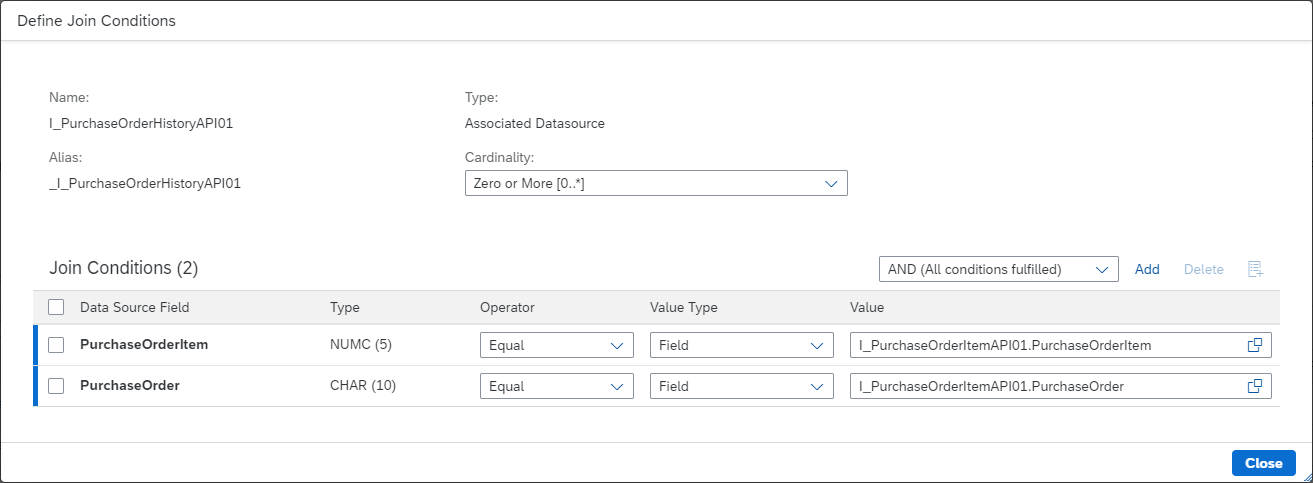
Ensure that Zero or More [0..*] is selected in the Cardinality setting.
- Select Close to return to the Custom CDS View Details, and select the Elements tab.
- Select Add > Elements.
-
In the dialog that appears, expand the aliases you created previously,
and enable these fields:
Table Field I_PurchaseOrderItemAPI01 PurchaseOrder I_PurchaseOrderItemAPI01 PurchaseOrderItem I_PurchaseOrderItemAPI01 OrderQuantity I_PurchaseOrderItemAPI01 PurchaseOrderItemText I_PurchaseOrderItemAPI01 OrderPriceUnit I_PurchaseOrderItemAPI01 PurchaseOrderQuantityUnit I_PurchaseOrderItemAPI01 IsCompletelyDelivered I_PurchaseOrderItemAPI01 PurchaseOrderItemCategory I_PurchaseOrderItemAPI01 NetPriceAmount I_PurchaseOrderItemAPI01 NetPriceQuantity I_PurchaseOrderItemAPI01 SupplierMaterialNumber I_PurchaseOrderItemAPI01 Material I_PurchaseOrderItemAPI01 PurchasingDocumentDeletionCode I_PurchaseOrderItemAPI01._PurchaseOrder CompanyCode I_PurchaseOrderItemAPI01._PurchaseOrder Supplier I_PurchaseOrderItemAPI01._PurchaseOrder PurchaseOrderDate I_PurchaseOrderItemAPI01._PurchaseOrder PurchasingProcessingStatus I_PurchaseOrderItemAPI01._PurchaseOrder CreationDate I_PurchaseOrderItemAPI01._PurchaseOrder DocumentCurrency I_PurchaseOrderItemAPI01._PurchaseOrder SupplierRespSalesPersonName I_PurchaseOrderHistoryAPI01 AccountAssignmentNumber I_PurchaseOrderHistoryAPI01 PurchasingHistoryDocumentType I_PurchaseOrderHistoryAPI01 PurchasingHistoryDocumentYear I_PurchaseOrderHistoryAPI01 PurchasingHistoryDocument I_PurchaseOrderHistoryAPI01 PurchasingHistoryDocumentItem I_PurchaseOrderHistoryAPI01 QtyInPurchaseOrderPriceUnit I_PurchaseOrderHistoryAPI01 DebitCreditCode -
Use the Filter tab in the
Custom CDS View Details
to create the filters below. Note that value of the second field is
empty.
Field Value I_PurchaseOrderItemAPI01._PurchaseOrder.PurchasingProcessingStatus 05 I_PurchaseOrderItemAPI01.PurchasingDocumentDeletionCode - Select Publish to finish creating your CDS view.
Create a CDS view for company tax procedures
When you create the CDS view for company tax procedures, you add this data source:
-
I_CompanyCode
- In SAP, navigate to Custom CDS Views and select Create.
-
Use the dialog that appears to specify a Label and Name.
The Name must start with "YY1_". For example: YY1_CompanyTaxProcedures
Note: You cannot modify the name later.
- Select External API in the Scenario setting.
- Select Create.
-
In the view that appears, select I_CompanyCode to include the company tax procedures as
a data source.
The data source appears in the Custom CDS View Details view.
- Select Close to return to the Custom CDS View Details, and select the Elements tab.
- Select Add > Elements.
-
In the dialog that appears, expand the aliases you created previously,
and enable these fields:
Table Field I_CompanyCode CompanyCode I_CompanyCode._Country Country I_CompanyCode CompanyCodeName I_CompanyCode._Country TaxCalculationProcedure I_CompanyCode CityName I_CompanyCode Language - Select Publish to finish creating your CDS view.
Create a CDS view for country tax codes
When you create the CDS view for country tax codes, you add these data sources and join them:
-
I_Country
-
I_TaxCode
- In SAP, navigate to Custom CDS Views and select Create.
-
Use the dialog that appears to specify a Label and Name.
The Name must start with "YY1_". For example: YY1_CountryTaxCodes
Note: You cannot modify the name later.
- Select External API in the Scenario setting.
- Select Create.
-
In the view that appears, select I_Country to include the country tax codes as a data
source.
The data source appears in the Custom CDS View Details view.
-
Select Add > Associated Data Source and use the
dialog that appears to add I_TaxCode as a data source.
Both data sources now appear in the Custom CDS View Details view.
-
Select Join Condition and
use the dialog that appears to join TaxCalculationProcedure with
I_Country.TaxCalculationProcedure.
Ensure that Zero or More [0..*] is selected in the Cardinality setting.
- Select Close to return to the Custom CDS View Details, and select the Elements tab.
- Select Add > Elements.
-
In the dialog that appears, expand the aliases you created previously,
and enable these fields:
Table Field I_Country Country I_Country TaxCalculationProcedure _I_TaxCode TaxCode _I_TaxCode TaxType _I_TaxCode._Text Language _I_TaxCode._Text TaxCodeName - Select Publish to finish creating your CDS view.
Create a CDS view for tax types
When you create the CDS view for tax types, you add this data source:
-
I_TaxTypeText
- In SAP, navigate to Custom CDS Views and select Create.
-
Use the dialog that appears to specify a Label and Name.
The Name must start with "YY1_". For example: YY1_TaxTypes
Note: You cannot modify the name later.
- Select External API in the Scenario setting.
- Select Create.
-
In the view that appears, select I_TaxTypeText to include the company tax types as a
data source.
The data source appears in the Custom CDS View Details view.
- Select the Elements tab.
- Select Add > Elements.
-
In the dialog that appears, expand the aliases you created previously,
and enable these fields:
Table Field I_TaxTypeText TaxType I_TaxTypeText Language I_TaxTypeText TaxTypeName - Select Publish to finish creating your CDS view.
Create a CDS view for company general ledger accounts
When you create the CDS view for company general ledger accounts, you add this data source:
-
I_GLAccount
- In SAP, navigate to Custom CDS Views and select Create.
-
Use the dialog that appears to specify a Label and Name.
The Name must start with "YY1_". For example: YY1_CompanyGLAccounts
Note: You cannot modify the name later.
- Select External API in the Scenario setting.
- Select Create.
-
In the view that appears, select I_GLAccount to include the company general ledger
accounts as a data source.
The data source appears in the Custom CDS View Details view.
- Select Close to return to the Custom CDS View Details, and select the Elements tab.
- Select Add > Elements.
-
In the dialog that appears, expand the aliases you created previously,
and enable these fields:
Table Field I_GLAccount GLAccount I_GLAccount CompanyCode I_GLAccount AccountIsMarkedForDeletion I_GLAccount AccountIsBlockedForCreation I_GLAccount AccountIsBlockedForPosting I_GLAccount AccountIsBlockedForPlanning I_GLAccount GLAccountGroup I_GLAccount._Text GLAccountName I_GLAccount._Text GLAccountLongName I_GLAccount._Text Language I_GLAccount._GLAccountInCompanyCode AccountIsBlockedForPosting Alias: AccountIsBlockedForPostingInCo
I_GLAccount._GLAccountInCompanyCode AccountIsMarkedForDeletion Alias: AccountIsMarkedForDeletionInCo
- Select Publish to finish creating your CDS view.
Create a communication scenario for each CDS view
To relay the CDS view results to Postman or other programming tools, you must create a communication scenario.
- Navigate to the Custom Communication Scenarios view.
- Select New.
- Specify the settings in the New Communication Scenario dialog and select New.
- Select the communication scenario you created in the previous step.
-
In the right pane, select the Add button (+).
The Add Services dialog appears.
- Select a custom CDS view that you created in the previous procedures and select OK.
- Select Publish.
- Repeat the steps above for the other CDS views.
Create a communication arrangement for the CDS views
-
Navigate to the Communication
Arrangements view and select New.
The New Communication Arrangement dialog appears.
- Select the Scenario you created in the previous procedure and select Create.
-
Enter "TENANTACCESS" in the Communication System setting and select Display.
The User Name setting is specified automatically.
-
Select Save.
Use Postman to ensure that your custom CDS view is configured correctly. For example, to get available resource for the PO history, use this endpoint:
{{TENANT_ENDPOINT}}:{{PORT}}/sap/opu/odata/sap/YY1_POHISTORY_CDS/
For example, to get the CDS view for the PO history, use this endpoint:
{{TENANT_ENDPOINT}}:{{PORT}}/sap/opu/odata/sap/YY1_POHISTORY_CDS/YY1_POHistory
Specify the CDS view APIs and resources in the target system settings
After you have created communication scenarios and arrangements for each of the CDS views you created above, you specify them in the corresponding settings in the target system settings. If you used the example names for the CDS views from the procedures above, your settings look like this:
| Tungsten AP Essentials target system setting | CDS API and resource |
|---|---|
| Purchase order history CDS API | YY1_POWithHistory_CDS/YY1_POWithHistory |
| Company tax procedures CDS API | YY1_CompanyTaxProcedures_CDS/YY1_CompanyTaxProcedures |
| Country tax codes CDS API | YY1_CountryTaxCode_CDS/YY1_CountryTaxCodes |
| Tax types CDS API | YY1_TAXTYPES_CDS/YY1_TaxTypes |
| Company GL accounts CDS API | YY1_COMPANYGLACCOUNTS_CDS/YY1_CompanyGLAccounts |
Define a communication system
To make the SAP S/4HANA Cloud ES data service available to your integration services, you must define a communication system. When you define the communication system, you perform these steps:
-
Create a communication system.
-
Create a communication user.
-
Add the user to the inbound connection.
-
Add the user to the outbound connection.
-
Create communication arrangements for the communication system.
Create a communication system
To make the SAP S/4HANA Cloud ES data service available to your integration services, you must create a communication system.
- Navigate to the Communication Systems view and select New.
- Use the view that appears to specify the system ID and name of the new communication system and select Create.
-
In the view that appears, specify these settings:
-
Host Name - The remote system for outgoing API service calls.
-
Logical System - The logical system ID that is required for IDoc communication.
-
Business System - The business system ID that identifies the communication system in your system landscape.
-
Port - The default value is 443.
-
Is Hub System - Select this setting if you send all B2B messages to a central hub, such as SAP Ariba.
-
Inbound Only - If you want your communication system to be used for a communication arrangement, based on a communication scenario that only contains inbound services, we recommend selecting this setting. If this setting is selected, settings relating to outbound communication are hidden.
-
UI Host Name - The host name of the remote system for outgoing API service calls.
-
- Select Save to save the new communication system settings.
Create a communication user
To make the SAP S/4HANA Cloud ES data service available to your integration services, you must create a communication user.
- Navigate to the Define Communication Users view (Maintain Communication Users app) and select New.
- Use the view that appears to specify the new user.
- Select Create to create the new user.
Add the user to the inbound connection
To make the SAP S/4HANA Cloud ES data service available to your integration services, you must add a user to an inbound connection.
- Navigate to the Communication Systems view and select the communication system you created above.
- Select Edit and select the Users for Inbound Communication tab.
- Select the Add button (+).
- In the view that appears, enter the user you created above in the User Name box and select OK.
- Select Save to save your settings.
Add the user to the outbound connection
When making the SAP S/4HANA Cloud ES data service available to your integration services, you can optionally add a user to an outbound connection.
- Navigate to the Communication Systems view and select the communication system you created above.
- Select Edit and select the Users for Outbound Communication tab.
- Select the Add button (+).
- In the view that appears, enter the user you created above in the User Name box and select Create.
- Select Save to save your changes.
Create communication arrangements for the communication system
You must bind all of these communication scenarios to your communication system:
| Arrangement Name | Scenario |
|---|---|
| SAP_COM_0008 | Business Partner, Customer and Supplier Integration |
| SAP_COM_0441 | Employee Central Financial Master Data Integration |
| SAP_COM_0108 | Material Document Integration |
| SAP_COM_0009 | Product Integration |
| SAP_COM_0053 | Purchase Order Integration |
| SAP_COM_0087 | SAP Analytics Cloud for Planning Integration |
| SAP_COM_0146 | Service Entry Sheet Integration |
| SAP_COM_0057 | Supplier Invoice Integration |
-
Navigate to the Communication
Arrangements view and select New.
The New Communication Arrangement dialog appears.
- Select one of the scenarios from the table above and select Create.
-
Enter the communication system you created above in the Communication System setting.
Ensure that the user you created above is specified in the User Name setting. Depending on your setup, that user can appear in the Inbound Communication settings, Outbound Communication settings, or both
-
In the Outbound
Communication settings, clear all of the Service Status boxes.
If your solution requires the service status, you can leave the boxes selected. However, then you must specify the replication models.
- Select Save.
- Repeat the steps above for each scenario in the table.
Adjust the Maintain Trusted Network Zone settings
If you want to link to invoice images in Tungsten AP Essentials storage from SAP, you must specify readsoftonline.com as a trusted host in the Maintain Trusted Network Zone settings in SAP:
- Log in to SAP S/4HANA Cloud ES and navigate to the Maintain Trusted Network Zone view.
- Select + in the Trusted Hosts settings.
-
Enter these settings:
Setting Value Trusted Host Name *.readsoftonline.com Schema HTTPS Port 443 Type Managed by customer
Create purchase orders for 3-way matching
Three-way matching, if enabled, is performed according to the quantities of goods received on the purchase order. In SAP S/4HANA, purchase order lines can have a setting called Goods-Receipt-Based Invoice Verification. When this setting is enabled, an invoice must reference a specific Goods Receipt related to the purchase order and invoice. To simplify this process, AP Essentials automatically determines the correct goods receipt reference, ensuring invoices can be sent to SAP without requiring manual selection.
When an invoice is posted for a purchase order with goods-receipt-based invoice verification, the connector checks for available goods receipts and determines whether the invoice can be created.
For each purchase order line that requires a goods receipt reference, the connector evaluates three possible scenarios:
-
No goods receipt exists – The invoice is rejected.
-
A goods receipt exists but has already been fully or partially invoiced – If the available (uninvoiced) quantity is less than what the invoice requires, the invoice is rejected.
-
A goods receipt exists with enough quantity for the invoice – The invoice is created with a reference to that goods receipt.
If there is only one suitable goods receipt for a purchase order line, the invoice is created. If there are multiple suitable goods receipts or none at all, the invoice is rejected and returned to AP Essentials with an error.
Note:
-
Each invoice line is processed independently.
-
The connector does not attempt to split an invoice line across multiple goods receipts.
-
The decision process ensures invoices are only created when there is complete certainty about the correct goods receipt reference.