Configure Dynamics 365 for Finance and Operations
Before you can use Dynamics 365 for Finance and Operations with Tungsten AP Essentials, you must configure Dynamics 365 by registering Tungsten AP Essentials in Azure AD and Dynamics 365.
Register Tungsten AP Essentials in Azure AD
To register the application in Azure AD:
- Open Azure portal and navigate to Azure Active Directory.
- Select App Registrations.
- Select New registration.
- Type a descriptive name for the new app registration, such as "Tungsten AP Essentials Dynamics365" and select Register.
- In the view that appears, copy the Application Client ID and Directory Tenant ID settings. You will need this information later.
-
Select API permissions and add
these permissions in the view that appears:
API / Permissions name Type Description Azure Active Directory Graph User.Read Delegated Sign in and read user profile Dynamics ERP AX.FullAccess Delegated Access Dynamics AX online as organization users CustomService.FullAccess Delegated Access Dynamics AX Custom Service Odata.FullAccess Delegated Access Dynamics AX data - Select Certificates and Secrets and use the view that appears to create a new client secret.
-
Type a descriptive name for the secret, such as "RSOSecret" and specify the
expiration date.
After the secret is generated, make sure you copy it to a safe place because it is never shown again.
If any of these steps fail, make sure you have sufficient privileges to perform these actions, or contact the person in your organization that is responsible for your Active Directory.
Register Tungsten AP Essentials in Dynamics 365
To register the application in Dynamics 365:
- In Dynamics 365, select the search icon and search for the "Microsoft Entra ID applications" page.
- On the Microsoft Entra ID applications page, select New to create a new application line.
- Specify a descriptive name, such as Tungsten AP Essentials.
- In the Client ID setting, specify the Application Client ID from the Azure AD settings in step 5 above.
-
Specify the Dynamics 365 user that you want to use for this integration.
The user that you specify must belong to the same Azure Active Directory as the Dynamics 365 app registration and have these roles:
-
Accounts payable clerk
-
Data management administrator
-
Data management migration user
-
Data management operations user
-
-
-
Process engineering manager
-
System user
-
Office integration power user
-
Power Automate administrator
-
-
Create a recurring data job
Watch how to create a recurring data job in less than two minutes
To create a recurring data job for importing invoices:
- In Dynamics 365, navigate to System administration > Data management IT.
- Select Import to create a new import project.
- From inside the new project, check the toolbar buttons to make sure you use the Enhanced view.
- Type a descriptive name for the import project, such as "Vendor Invoice Import".
-
Select Add file.
-
Use d365-import-data-template.zip if you use Vendor invoice document attachment V1.
-
Use d365-import-data-template-v2.zip if you use Vendor invoice document attachment V2.
Make sure the Use Vendor invoice document attachment V1 setting corresponds to your version.
If you use custom header fields or line fields in Dynamics 365, you must modify the contents of the ZIP file above to include the custom fields and use the modified ZIP file instead.
If you get a warning about the length of a Notes field, you can safely ignore the warning.
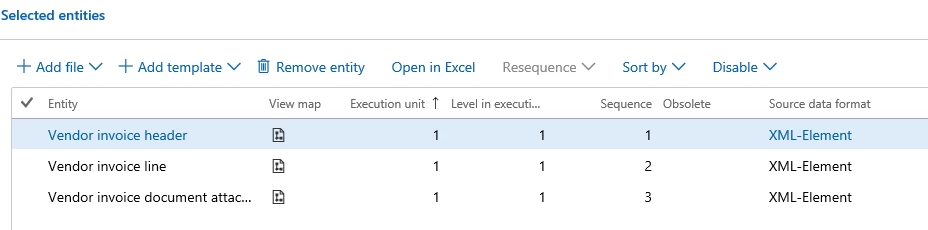
Adding the default ZIP file adds three entities to the import job.
-
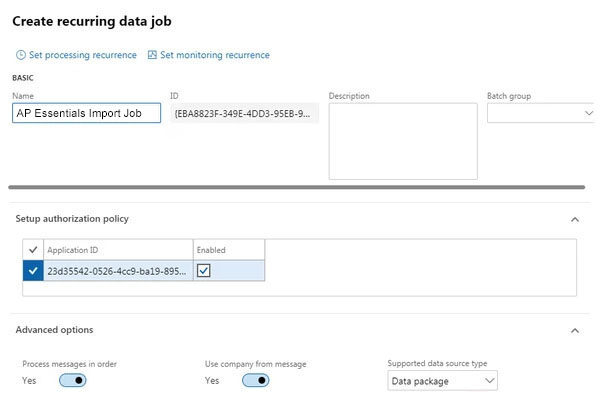
- Select Create recurring data job in the main menu.
- Type a descriptive name for the job, such as "Tungsten AP Essentials Import Job".
- Select Set processing recurrence, and set the recurrence to, for example, every fifth minute.
- Copy the ID of the job. Later, you type this ID in the Recurring data job ID setting.
-
In the Setup authorization policy
settings, type the Application Client ID that you created in the Azure AD
section above, and select the Enabled setting.
-
Select Data package as the
Supported data source type.
After the job is created, the jobs and their history logs can be found under System Administration > Data Management IT.