AP Essentials Connect for PROCESS DIRECTOR AP

Learn how to set up and use AP Essentials Connect for PROCESS DIRECTOR AP.

Kofax AP Essentials Connect is a program you can install on a local computer and use to perform a number of tasks, such as uploading documents to Kofax AP Essentials. It is an alternative to uploading documents using the web interface in Kofax AP Essentials. Using Kofax AP Essentials Connect, you can upload documents automatically, lessening the effort of uploading documents one by one.

AP Essentials Connect runs as a service in the background, so it is not necessary to start a program each time you want to upload documents. Instead, you simply move the files you want to upload to the folders you specify during the installation setup.

AP Essentials Connect can be beneficial if you want to:

  • Upload large numbers of documents.
  • Automate the process of uploading documents.
  • Download output data from Kofax AP Essentials.
  • Automatically register supplier documents in external systems.

Note that the user interface for Kofax AP Essentials Connect is currently only available in English.

Other flavors of AP Essentials Connect

Kofax AP Essentials Connect can display different settings, depending on which target system you use. Before you continue reading, make sure you choose the AP Essentials Connect guide that matches your target system. If you don't find a match, read the generic guide for AP Essentials Connect.

AP Essentials Connect System requirements

Kofax AP Essentials Connect supports the following operating systems:

  • Windows 10
  • Windows 8.1
  • Windows Server 2019 Standard
  • Windows Server 2019 Datacenter
  • Windows Server 2016
  • Windows Server 2012 and Windows Server 2012 R2

Kofax AP Essentials Connect requires the following:

  • Microsoft .NET Framework 4.8.
  • An HTTPS connection which uses port 443.

The integration for Dynamics AX requires WCF Activation components.

Creating a customer account

In order to use AP Essentials Connect you must make sure that your account in Kofax AP Essentials is set up properly.

After you have created a new customer account, check the following:

  • You cannot specify PROCESS DIRECTOR AP as a target system, if Workflow services are enabled.
  • In order to send invoices to PROCESS DIRECTOR AP, make sure PROCESS DIRECTOR AP is specified in the target system service (Services > Target system) for the account.
  • Make sure the you add at least one buyer. The External ID (External reference ID) of each buyer must match a company code in PROCESS DIRECTOR AP. You can add additional buyers if your organization has more than one buyer.

    If you add a new buyer to the system after you configure Kofax AP Essentials Connect you must run the configuration wizard again and specify the new upload locations.

After you create a customer account with appropriate services and buyers, you are ready to install Kofax AP Essentials Connect.

Installation

If you use a proxy connection to connect to the Internet, make sure you specify the Windows proxy settings before you install Kofax AP Essentials Connect.

To install Kofax AP Essentials Connect:

  1. Download and run the setup file from the URL that corresponds to your location. Note that an HTTPS connection on port 443 is required to download the installation. After the installation, the connection is required to receive program updates.
    Welcome
  2. Specify the installation folder and click Next to continue:
    Destination Folder
  3. Click Install to confirm your settings and install Kofax AP Essentials Connect.
    Install
  4. After the installation, click Finish to launch Kofax AP Essentials Connect and run the setup wizard.
    Finish

Troubleshooting the installation

When running the installation, some computers display a message that states, "Installation directory must be on a local drive." If you receive this message, run this command as an administrator in Windows Command Prompt:

msiexec /i "C:\[path]\Kofax AP Essentials Connect.msi" WIXUI_DONTVALIDATEPATH="1"

AP Essentials Connect Setup for PROCESS DIRECTOR AP

Be sure to specify the target-system settings correctly before you begin.

The first time you run Kofax AP Essentials Connect, a setup wizard appears to help you configure the initial settings. If you see the Kofax AP Essentials Connect dialog instead of the wizard, click Configure to display the wizard.

The steps that appear in the wizard can vary, depending on the services that are enabled in Kofax AP Essentials.

1. Click Next to begin.

Welcome

2. Use the information provided in your account-information email to fill in the Login address, Authorization key, User name and Password.

Login information

Login address
  • https://services.readsoftonline.com – for users in Europe.
  • https://services-us.readsoftonline.com – for US users.
  • https://services-au.readsoftonline.com – for users in Australia.
Authorization key (API Key) You can obtain the key from your account-information email or from an administrator, who can find the key in the Target system view in Admin Center.
User name

The user name you use to log in to Kofax AP Essentials.

The user must be a customer admin or customer user. If only one target system is enabled on the partner level, partner admins and partner users are also supported. Group users are not supported.

Password The password for User name.

3. Configure optional dialogs that can appear, depending on the services that are enabled in Kofax AP Essentials:

4. After you complete the required procedures from step 3 above, click Save to save the settings and exit the wizard.

Configuration complete

If you add new customer accounts or buyers to the system or change the Target system service settings after you configure AP Essentials Connect, you must run the configuration wizard again and specify the new upload locations.

If you want to change the Output image format from TIF to PDF (Target system configuration settings), you must process all of the documents in the system before you change this setting. Failure to do so will result in output errors.

Windows users that run Kofax AP Essentials Connect must have Read, Write and Modify permissions on all of the folders you specify in the setup.

Configure settings for uploading documents

Admin users must have the Process documents privilege to see this dialog and upload documents using Kofax AP Essentials Connect.

If the Image upload service is enabled, you can use Kofax AP Essentials Connect to upload documents to Kofax AP Essentials. Customers can upload their own documents for processing, and partner administrators can upload images on behalf of all of their customers.

Uploading documents

Ideally, you specify the Root folder, and then click   to automatically generate the subfolders. Subfolder are created for each buyer defined in Kofax AP Essentials. If no buyers are defined, the subfolder has the same name as the organization (customer account). These subfolders determine which buyer the documents are connected to when they are uploaded to Kofax AP Essentials. Additional subfolders are created for each document type, if the buyer has more than one document type.

Folder examples

In this example, the Folder containing scanned images is named “Upload."

Upload documents toKofax AP Essentials
  • Upload documents to Kofax AP Essentials – Specifies whether you use Kofax AP Essentials Connect to upload documents to Kofax AP Essentials.
  • – Auto-generates the folder structure inside the Root folder.
  • – Displays a dialog which you can use to add a folder location manually. When you specify the folder location, you can optionally associate a buyer/seller and document type with the folder. Partner administrators can also specify a customer account.
  •   – Displays a dialog which you can use to edit the selected folder location.
  •   – Removes the selected folder from the Upload locations list. Note that the folder is not deleted from the hard drive.
  • – Removes all of the folders from the Upload locations list. Note that the folders are not deleted from the hard drive.
  • Upload locations – Displays a list of locations where Kofax AP Essentials Connect looks for images to upload to Kofax AP Essentials.
  • Processed documents folder – Specifies the folder where you want to move the images after they have been uploaded.
  • Document sorting - Determines how many documents each file can contain. See Help for more information about page separation.
  • Upload documents automatically - When this setting is selected, files located in subfolders of the Folder list are automatically uploaded as soon as they are detected. If this setting is not selected, you must click the Upload documents button in the Kofax AP Essentials Connect interface to manually upload images.
  • Allow upload of XML files with matching image file - Normally, when you upload XML documents, Kofax AP Essentials automatically creates a document image from the XML data, so users can visualize the data during verification. If your solution uses XML documents and a document image file, select this setting, so you can upload both of these files, and Kofax AP Essentials will display the original document image during verification, instead of creating one from the XML data. This is helpful because it offers the superior data capture of XML, while displaying the original document image, which might contain additional information that is not available in the XML. Make sure that the corresponding file pairs have the same file name.

Import master data via the Master data service

Importing master data using the master data service differs from uploading master data as described above. When you select Master data service in the setup wizard, master data is imported directly from PROCESS DIRECTOR AP. When importing the master data, CorporateGroupID elements in PROCESS DIRECTOR AP master data are mapped with the external IDs of buyers in Kofax AP Essentials. Master data is only imported for buyers that match a CorporateGroupID.

Export to PROCESS DIRECTOR AP

Configure settings for exporting to PROCESS DIRECTOR Account Payable

If PROCESS DIRECTOR AP is specified as a target system, you can use Kofax AP Essentials Connect to automatically export invoices to PROCESS DIRECTOR AP. Be sure to specify the target-system settings correctly before you begin.

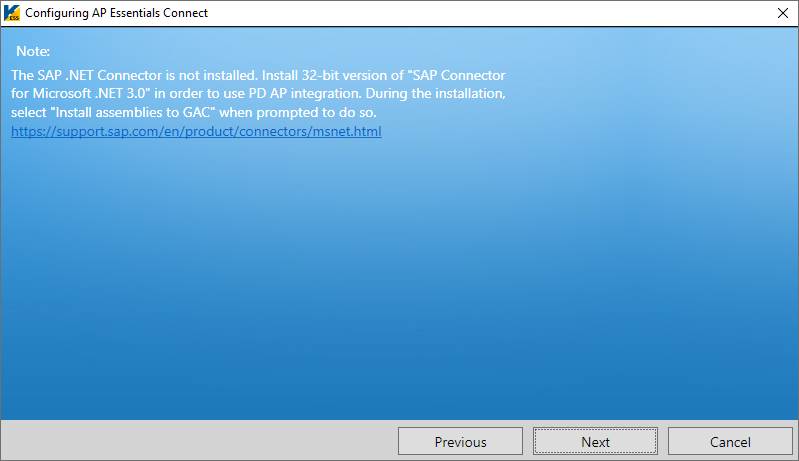
  1. If prompted to do so, install the SAP Connector for Microsoft .NET 3.0, and make sure you select Install assemblies to GAC during the installation.

    Microsoft Visual C++ 2010 Redistributables must be installed before installing SAP Connector for Microsoft .NET 3.0. You must install the x86 version of Microsoft Visual C++ 2010 Redistributables. The x64 version is incompatible with the integration.

    You must install the x86 version of SAP Connector for Microsoft .NET 3.0. The x64 version is incompatible with the integration.

    Export to PROCESS DIRECTOR AP
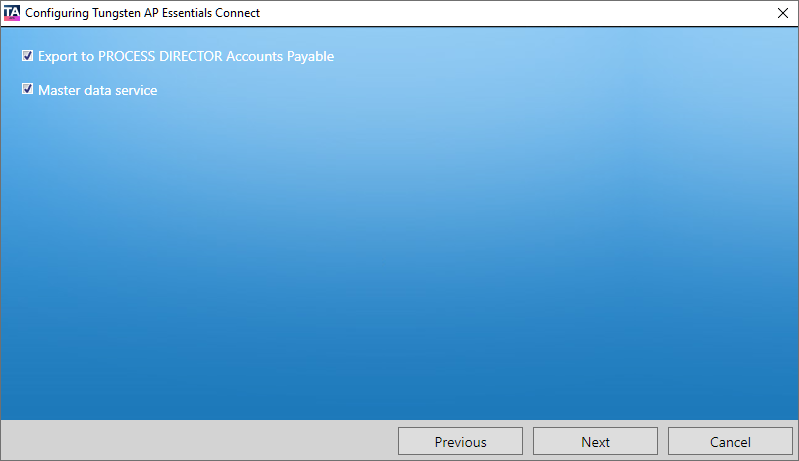
  2. Select Export to PROCESS DIRECTOR AP and optionally select Master data service to map the CorporateGroupID elements in PROCESS DIRECTOR AP master data with external IDs of buyers in Kofax AP Essentials.
    Export to PROCESS DIRECTOR AP
    Export to PROCESS DIRECTOR Accounts Payable Enables the integration between Kofax AP Essentials and PROCESS DIRECTOR AP.
    Master data service

    Enables master-data import from PROCESS DIRECTOR AP.

    If you enable this setting, you must configure the Supplier master-data file setting. Kofax AP Essentials Connect imports the master data by regularly importing the file you specify in the Supplier master-data file setting.

    Kofax AP Essentials matches the CorporateGroupID elements in PROCESS DIRECTOR AP master data with external IDs of buyers in Kofax AP Essentials. Master data is only imported for buyers that match a CorporateGroupID.

Setup for multiple customers

If you log in to Kofax AP Essentials Connect as a partner administrator, you can configure settings for each customer that uses PROCESS DIRECTOR AP as the target system. The feature saves you time because you do not have to log in to different accounts to configure multiple customers.

Using AP Essentials Connect with PROCESS DIRECTOR AP

After following the procedures above to setup AP Essentials Connect, you are ready to use it in production.

Uploading documents using AP Essentials Connect

You can upload documents to Kofax AP Essentials in these supported file formats using AP Essentials Connect:

  • JPEG, JPG
  • PDF version 1.3 to 1.7
  • PNG
  • TIFF, TIF
  • XML

Admin users must have the Process documents privilege to upload documents using Kofax AP Essentials Connect.

Automatic uploading

If you selected Upload documents automatically when configuring Kofax AP Essentials Connect for uploading documents, no interaction is required. When files are moved to the subfolder(s) of the location you specified in the configuration, they are automatically uploaded.

Kofax AP Essentials Connect runs continuously in the background as a Windows service and periodically checks (every 15 minutes by default) for new files to upload. When new files are found, they are uploaded automatically. Even if you restart the computer, Kofax AP Essentials Connect runs automatically in the background with no need for interaction. If a problem occurs during the upload, the upload operation will timeout after 10 minutes.

Most users use automatic uploading, and set up their scanners to save files directly in the appropriate subfolders that are created during the configuration.

If you have more than one document type, but you place files in the parent folder of the document type folders, the files are uploaded and processed using the Default document type specified in the Extraction service settings.

Manually uploading documents

If you did not select Upload documents automatically when configuring Kofax AP Essentials Connect, you can upload files manually at your convenience:

  1. Start Kofax AP Essentials Connect from the Windows Start menu.
    Kofax AP EssentialsConnect
  2. Move or scan document image files to an appropriate subfolder of the location you specified in the configuration, and click Refresh so you can see the files in the list. You can also click the Event log tab to check for errors.
    If you do not see files in the list, make sure you place the files in a subfolder that corresponds to an organization or buyer in Kofax AP Essentials.
    Kofax AP EssentialsConnect Upload
  3. Click Upload documents. You can click Refresh to see that the images have uploaded or use the Event log to monitor the progress of your uploads.
    Kofax AP EssentialsConnect Event Log

Troubleshooting AP Essentials Connect for PROCESS DIRECTOR AP

Generic issues

Do not run multiple instances of AP Essentials Connect at the same time for a single customer account. Doing so causes errors because each instance competes to process the same documents.

If you have problems running Kofax AP Essentials Connect:

You can click the links above to test if you have access. Click the links using the same computer that runs Kofax AP Essentials Connect. If you receive a 404 error, you do not have access.

  • Make sure you can download the files that are listed in the page that is displayed when you click one of the links above. To do this, replace "Deployment.manifest" in the URL with one of the file names in the list.
  • Log in to Kofax AP Essentials using the same computer that runs Kofax AP Essentials Connect to make sure you can connect to Kofax AP Essentials.
  • If you use a proxy connection, make sure the settings are applied to the same user/account that runs Kofax AP Essentials Connect. By default, this is a local System account. To test this, access Kofax AP Essentials using a location above, then change the Kofax AP Essentials Connect user to the same Windows user you tested with.

Login issues

If you receive the message, "Name or password is incorrect (repeat logon)", it can be caused by using an exclamation point (!) in your password. Even if the login information works correctly using "SAP logon", the exclamation point can cause problems when using AP Essentials Connect.

To resolve this issue, try changing your password to a password that does not use exclamation points.