AP Essentials Connect for Visma Business
Learn how to set up and use AP Essentials Connect for Visma Business.
Tungsten AP Essentials Connect is a program you can install on a local computer and use to perform a number of tasks, such as uploading documents to AP Essentials. It is an alternative to uploading documents using the web interface in AP Essentials. Using AP Essentials Connect, you can upload documents automatically, lessening the effort of uploading documents one by one.
AP Essentials Connect runs as a service in the background, so it is not necessary to start a program each time you want to upload documents. Instead, you simply move the files you want to upload to the folders you specify during the installation setup.
AP Essentials Connect can be beneficial if you want to:
- Upload large numbers of documents.
- Automate the process of uploading documents.
- Download output data from AP Essentials.
- Automatically register supplier documents in external systems.
Note that the user interface for Tungsten AP Essentials Connect is currently only available in English.
Other flavors of AP Essentials Connect
Tungsten AP Essentials Connect can display different settings, depending on which target system you use. Before you continue reading, make sure you choose the AP Essentials Connect guide that matches your target system. If you don't find a match, read the generic guide for AP Essentials Connect.
AP Essentials Connect System requirements
Tungsten AP Essentials Connect supports the following operating systems:
- Windows 11
- Windows 10
- Windows 8.1
- Windows Server 2019 Standard
- Windows Server 2019 Datacenter
- Windows Server 2016
- Windows Server 2012 and Windows Server 2012 R2
Tungsten AP Essentials Connect requires the following:
- Microsoft .NET Framework 4.8.
- An HTTPS connection which uses port 443.
Creating a customer account
In order to use AP Essentials Connect you must make sure that your account in Tungsten AP Essentials is set up properly.
After you have created a new customer account, check the following:
- In order to send invoices to Visma Administration, make sure Visma Business is specified in the target system service () for the account.
- You can also
add buyers if your organizations has more than one buyer.
If you add a new buyer to the system after you configure AP Essentials Connect, you must run the configuration wizard again and specify the new upload locations.
- The ID, or External ID for buyers, must match the company ID in Visma Business.
After you create a customer account with appropriate services, you are ready to install Tungsten AP Essentials Connect.
Installation
If you use a proxy connection to connect to the Internet, make sure you specify the Windows proxy settings before you install Tungsten AP Essentials Connect.
To install Tungsten AP Essentials Connect:
-
Download and run the setup file from the URL that corresponds to your location. Note that an HTTPS connection on
port 443 is required to download the installation. After the installation, the connection is required to receive program updates.
- Europe: https://production.readsoftonline.com/install/connect
- Australia: https://au.readsoftonline.com/install/connect
- US: https://us.readsoftonline.com/install/connect

-
Specify the installation folder and click
Next to continue:

-
Click
Install to confirm your settings and install
Tungsten AP Essentials Connect.

-
After the installation, click
Finish to launch
Tungsten AP Essentials Connect
and run the setup wizard.

Troubleshooting the installation
When running the installation, some computers display a message that states, "Installation directory must be on a local drive." If you receive this message, run this command as an administrator in Windows Command Prompt:
msiexec /i "C:\Program Files (x86)\Tungsten\AP Essentials Connect\Tungsten AP Essentials Connect.msi" WIXUI_DONTVALIDATEPATH="1"
AP Essentials Connect Setup for Visma Business
Be sure to specify the target-system settings correctly before you begin.
The first time you run Tungsten AP Essentials Connect, a setup wizard appears to help you configure the initial settings. If you see the Tungsten AP Essentials Connect dialog instead of the wizard, click Configure to display the wizard.
The steps that appear in the wizard can vary, depending on the services that are enabled in AP Essentials.
1. Click
Next to begin.

2. Use the information provided in your account-information email to fill in the
Login address,
Authorization key,
User name and
Password.

| Login address |
|
| Authorization key (API Key) | You can obtain the key from your account-information email or from an administrator, who can find the key in the Target system view in Admin Center. |
| User name |
The user name you use to log in to AP Essentials. The user must be a customer admin or customer user. If only one target system is enabled on the partner level, partner admins and partner users are also supported. Group users are not supported. |
| Password | The password for User name. |
3. Configure optional dialogs that can appear, depending on the services that are enabled in Tungsten AP Essentials:
- Configure settings for uploading documents.
- Configure settings for registering invoices in Visma Administration.
4. After you complete the required procedures from step 3 above, click
Save to save the settings and exit the wizard.

If you want to change the Output image format from TIF to PDF (Target system configuration settings), you must process all of the documents in the system before you change this setting. Failure to do so will result in output errors.
Windows users that run Tungsten AP Essentials Connect must have Read, Write and Modify permissions on all of the folders you specify in the setup.
Configure settings for uploading documents
If the Image upload service is enabled, you can use Tungsten AP Essentials Connect to upload documents to AP Essentials. Customers can upload their own documents for processing, and partner administrators can upload images on behalf of all of their customers.

Ideally, you specify the Root folder, and then click
![]() to automatically generate the subfolders. Subfolder are created for each
buyer defined in
AP Essentials. If no buyers are defined, the
subfolder has the same name as the organization (customer account). These subfolders determine which buyer the documents are
connected to when they are uploaded to
AP Essentials. Additional subfolders are created
for each document type, if the buyer has more than one document type.
to automatically generate the subfolders. Subfolder are created for each
buyer defined in
AP Essentials. If no buyers are defined, the
subfolder has the same name as the organization (customer account). These subfolders determine which buyer the documents are
connected to when they are uploaded to
AP Essentials. Additional subfolders are created
for each document type, if the buyer has more than one document type.

In this example, the Folder containing scanned images is named “Upload."
- Upload documents to AP Essentials – Specifies whether you use Tungsten AP Essentials Connect to upload documents to AP Essentials.
 – Auto-generates the folder structure inside the
Root folder.
– Auto-generates the folder structure inside the
Root folder.
 – Displays a dialog which you can use to add a folder location manually. When
you specify the folder location, you can optionally associate a buyer/seller and document type with the folder. Partner
administrators can also specify a customer account.
– Displays a dialog which you can use to add a folder location manually. When
you specify the folder location, you can optionally associate a buyer/seller and document type with the folder. Partner
administrators can also specify a customer account.
 – Displays a dialog which you can use to edit the selected folder location.
 – Removes the selected folder from the Upload locations list. Note that the
folder is not deleted from the hard drive.
– Removes the selected folder from the Upload locations list. Note that the
folder is not deleted from the hard drive.
 – Removes all of the folders from the Upload locations list. Note that the
folders are not deleted from the hard drive.
– Removes all of the folders from the Upload locations list. Note that the
folders are not deleted from the hard drive.
- Upload locations – Displays a list of locations where Tungsten AP Essentials Connect looks for images to upload to AP Essentials.
- Processed documents folder – Specifies the folder where you want to move the images after they have been uploaded.
- Document sorting - Determines how many documents each file can contain. See Help for more information about page separation.
- Upload documents automatically - When this setting is selected, files located in subfolders of the Folder list are automatically uploaded as soon as they are detected. If this setting is not selected, you must click the Upload documents button in the Tungsten AP Essentials Connect interface to manually upload images.
- Allow upload of XML files with matching image file - Normally, when you upload XML documents, AP Essentials automatically creates a document image from the XML data, so users can visualize the data during verification. If your solution uses XML documents and a document image file, select this setting, so you can upload both of these files, and AP Essentials will display the original document image during verification, instead of creating one from the XML data. This is helpful because it offers the superior data capture of XML, while displaying the original document image, which might contain additional information that is not available in the XML. Make sure that the corresponding file pairs have the same file name.
Configure settings for registering invoices in Visma Business
If the Target system service is enabled in Tungsten AP Essentials and Visma Business is specified as a target system, you can use Tungsten AP Essentials Connect to automatically register invoices with Visma Business. You can also use Tungsten AP Essentials Connect to import the supplier registry from Visma Business to Tungsten AP Essentials.
- If the configuration wizard cannot find a Visma Business installation on your computer, a dialog prompts you to specify the location of the integration DLL. If prompted to do so, specify the folder where Visma Business is installed, otherwise continue to the next step.
-
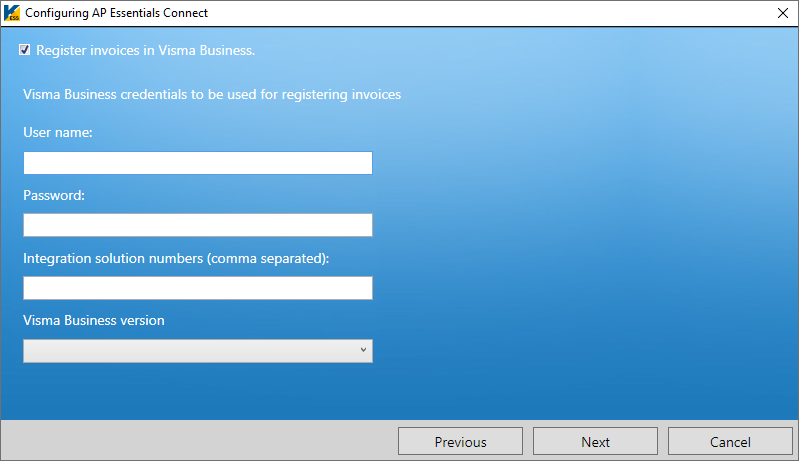
Select
Register invoices in Visma Business and specify a
User name and
Password that has permission to register invoices in Visma Business. Use
the
Integration solution numbers box to specify solution numbers that match
your Visma Business license, and select your
Visma Business version.
-
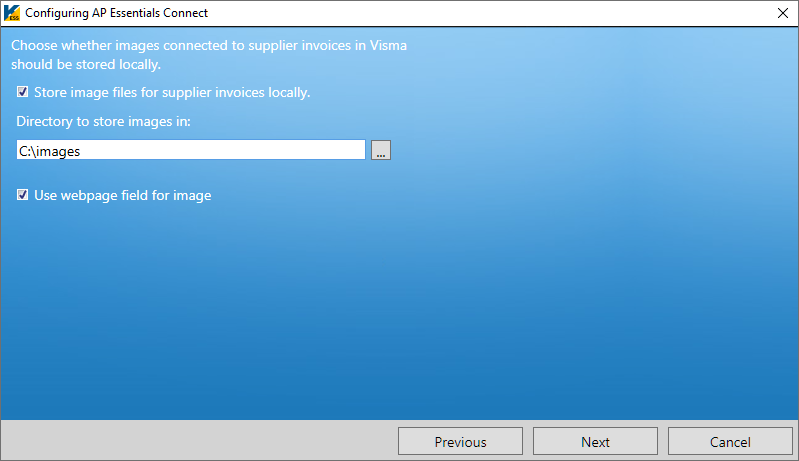
Optionally specify whether you want to store a copy of the invoice image files locally in your network.
Use web page field for image – Specifies whether the WebPageLink field (in Visma Business) is used to specify the path to the invoice image. If you do not select this setting, the PictureFileName field is used.
 Tungsten Automation does not perform a backup of this folder.
 -
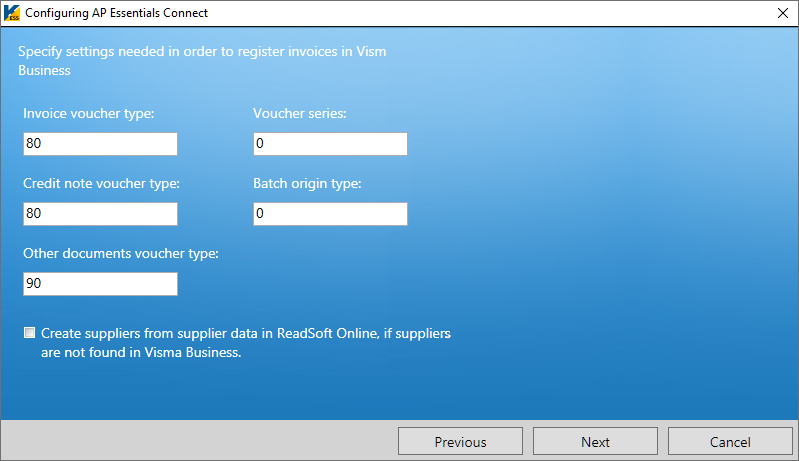
Specify the settings required to register invoices in Visma Business.
- Invoice voucher type – Specifies the voucher type used for invoices.
- Voucher series – Specifies a voucher series number for invoice batches. Usually, you specify a series that is designated for Tungsten AP Essentials.
- Credit note voucher type – Specifies the voucher type used for credit notes.
- Batch origin type – Specifies the origin type of the batch.
- Other documents voucher type – Specifies the voucher type used for documents that do not match any of the other types.
- Create suppliers from supplier data in
Tungsten AP Essentials, if suppliers are not found in
Visma Business – Determines whether suppliers created during verification are created in Visma Business. When this
setting is selected, if a supplier is created during verification in
Tungsten AP Essentials, and the supplier is not found in
Visma Business when the invoice is posted, then
Tungsten AP Essentials
will create the supplier in Visma Business.
When creating a supplier during verification, you must provide at least the supplier name and supplier number.
-
Specify the master-data that you want to synchronize with Visma Business. Note that this is the preferred method
to use for synchronizing master data with Visma Business. Do not upload mater data using XML files, as described in the next
section, unless you need to upload field-value master data.

- Suppliers, G/L Accounts, Currencies etc. – Specifies the master data that you want to synchronize.
- Update supplier coding suggestions – Determines whether the coding history for updated batches in Visma Business is used for automatic coding suggestions in Tungsten AP Essentials.
- Update invoice coding in Storage – Determines whether coding is updated in Tungsten AP Essentials Storage when the coding changes are made in updated batches in Visma Business.
- Org. unit 1, Org unit 2 etc. – specifies the organizational units (coding fields) that you want to use with Tungsten AP Essentials. When you add coding fields to a workflow in Tungsten AP Essentials, the Internal name must mach the Orig. field type name you specify here.
Master data
Master data is business information—such as supplier address information or other identifying information—that is used by multiple systems and applications. Tungsten AP Essentials can utilize master data from an external system to provide information when processing invoices. For example, Tungsten AP Essentials can use supplier master data to populate the Supplier list during verification.
If the Master data service is enabled, Tungsten AP Essentials synchronizes master data with Visma Business, but you cannot upload master data from Tungsten AP Essentials to Visma Business. Tungsten AP Essentials Connect synchronizes master data from one Visma Business company at a time, every two minutes, but no company is synchronized more than once every twelve hours.
Sometimes master data synchronization can involve the transfer of large volumes of data. To reduce bandwidth, and maintain mater-data integrity, Tungsten AP Essentials synchronizes master data.
Using AP Essentials Connect with Visma Business
After following the procedures above to setup AP Essentials Connect, you are ready to use it in production.
Uploading documents using AP Essentials Connect
You can upload documents to AP Essentials in these supported file formats using AP Essentials Connect.
Automatic uploading
If you selected Upload documents automatically when configuring Tungsten AP Essentials Connect for uploading documents, no interaction is required. When files are moved to the subfolder(s) of the location you specified in the configuration, they are automatically uploaded.
Tungsten AP Essentials Connect runs continuously in the background as a Windows service and periodically checks (every 15 minutes by default) for new files to upload. When new files are found, they are uploaded automatically. Even if you restart the computer, Tungsten AP Essentials Connect runs automatically in the background with no need for interaction. If a problem occurs during the upload, the upload operation will timeout after 10 minutes.
Most users use automatic uploading, and set up their scanners to save files directly in the appropriate subfolders that are created during the configuration.
If you have more than one document type, but you place files in the parent folder of the document type folders, the files are uploaded and processed using the Default document type specified in the Extraction service settings.
Manually uploading documents
If you did not select Upload documents automatically when configuring Tungsten AP Essentials Connect, you can upload files manually at your convenience:
-
Start
Tungsten AP Essentials Connect
from the Windows Start menu.

-
Move or scan document image files to an appropriate subfolder of the location you specified in the
configuration, and click
Refresh so you can see the files in the list. You can also click the
Event log tab to check for errors.
If you do not see files in the list, make sure you place the files in a subfolder that corresponds to an organization or buyer in AP Essentials.

-
Click
Upload documents. You can click
Refresh to see that the images have uploaded or use the Event log to
monitor the progress of your uploads.

Troubleshooting AP Essentials Connect for Visma Business
Generic issues
If you have problems running Tungsten AP Essentials Connect:
- Make sure you have access to the URL that corresponds to your location:
You can click the links above to test if you have access. Click the links using the same computer that runs Tungsten AP Essentials Connect. If you receive a 404 error, you do not have access.
- Make sure you can download the files that are listed in the page that is displayed when you click one of the links above. To do this, replace "Deployment.manifest" in the URL with one of the file names in the list.
- Log in to AP Essentials using the same computer that runs Tungsten AP Essentials Connect to make sure you can connect to AP Essentials.
- If you use a proxy connection, make sure the settings are applied to the same user/account that runs Tungsten AP Essentials Connect. By default, this is a local System account. To test this, access AP Essentials using a location above, then change the Tungsten AP Essentials Connect user to the same Windows user you tested with.
Failed to update value in row
Failed to update value in row. Result: Ts_RowSetValue_ReferenceNotAccepted, Column: C_Voucher.C_Voucher_VoucherType, Value: 39
This error appears if Visma Business is missing a voucher type. In the case above, the voucher type “39 – Other” is missing. To resolve this error, you must create the voucher type in Visma Business and approve the invoice again.