Online Connect Setup for Visma Business
The first time you run ReadSoft Online Connect, a setup wizard appears to help you configure the initial settings.
Be sure to specify the target-system settings correctly before you begin.
The first time you run ReadSoft Online Connect, a setup wizard appears to help you configure the initial settings. If you see the ReadSoft Online Connect dialog instead of the wizard, click Configure to display the wizard.
The steps that appear in the wizard can vary, depending on the services that are enabled in ReadSoft Online.
1. Click
Next to begin.

2. Use the information provided in your account-information email to fill in the Login address, Authorization key, User name
and Password.

| Login address |
|
| Authorization key (API Key) | You can obtain the key from your account-information email or from an administrator, who can find the key in the Target system view in Admin Center. |
| User name | The user name you use to log in to ReadSoft Online. |
| Password | The password for User name. |
3. Configure optional dialogs that can appear, depending on the services that are enabled in ReadSoft Online:
4. Click
Save to save the settings and exit the wizard.

If you want to change the Output image format from TIF to PDF (Target system configuration settings), you must process all of the invoices in the system before you change this setting. Failure to do so will result in output errors.
Windows users that run ReadSoft Online Connect must have Read, Write and Modify permissions on all of the folders you specify in the setup.
Uploading documents
If the Image upload service is enabled, you can use ReadSoft Online Connect to upload invoices to ReadSoft Online. Customers can upload their own invoices for processing, and partner administrators can upload images on behalf of all of their customers.

Ideally, you specify the Root folder, and then click
![]() to automatically generate the subfolders. Subfolder are created for each buyer defined in
ReadSoft Online. If no buyers are defined, the subfolder has
the same name as the organization (customer). These subfolders determine which buyer the documents are connected to when they are
uploaded to
ReadSoft Online. Additional subfolders are created for each
document type, if the buyer has more than one document type.
to automatically generate the subfolders. Subfolder are created for each buyer defined in
ReadSoft Online. If no buyers are defined, the subfolder has
the same name as the organization (customer). These subfolders determine which buyer the documents are connected to when they are
uploaded to
ReadSoft Online. Additional subfolders are created for each
document type, if the buyer has more than one document type.

- Upload documents to ReadSoft Online – Specifies whether you use ReadSoft Online Connect to upload invoices to ReadSoft Online.
 – Auto-generates the folder structure inside the Root folder.
 – Displays a dialog which you can use to add a folder location manually.
 – Displays a dialog which you can use to edit the selected folder location.
 – Removes the selected folder from the Upload locations list. Note that the
folder is not deleted from the hard drive.
– Removes the selected folder from the Upload locations list. Note that the
folder is not deleted from the hard drive.
 – Removes all of the folders from the Upload locations list. Note that the
folders are not deleted from the hard drive.
– Removes all of the folders from the Upload locations list. Note that the
folders are not deleted from the hard drive.
- Upload locations – Displays a list of locations where ReadSoft Online Connect looks for images to upload to ReadSoft Online.
- Processed documents folder – Specifies the folder where you want to move the images after they have been uploaded.
- Document sorting - Determines how many documents each file can contain. See Help for more information about page separation.
- Upload documents automatically - When this setting is selected, files located in subfolders of the Folder list are automatically uploaded as soon as they are detected. If this setting is not selected, you must click the Upload documents button in the ReadSoft Online Connect interface to manually upload images.
- Allow upload of XML files with matching image file - Normally, when you upload XML invoices, ReadSoft Online automatically creates an invoice image from the XML data, so users can visualize the data during verification. If your solution uses XML invoices and an invoice image file, select this setting, so you can upload both of these files, and ReadSoft Online will display the original invoice image during verification, instead of creating one from the XML data. This is helpful because it offers the superior data capture of XML, while displaying the original invoice image, which might contain additional information that is not available in the XML. Make sure that the corresponding file pairs have the same file name.
Folder naming conventions for master data
By default, ReadSoft Online Connect does not allow special characters, such as dots and slashes, in folder names that you use for uploading and downloading master data. When ReadSoft Online Connect encounters a special character, it is automatically replaced with an underscore when creating folders. However, you can override the default behavior by adjusting the ReadSoft Online Connect configuration file, ReadSoft.Connect.Host.exe.config (default location: C:\ProgramData\ReadSoft Software Services AB\ReadSoftOnlineConnect). This is helpful, for example, if you have an organization that contains special characters in its name, and you require folder names other than the default naming convention.
To override the default behavior, you use XML to specify the incoming name (object name) and the outgoing name (folder name). For example, assume you have a customer named “example.com”. When ReadSoft Online Connect makes folders for example.com, it changes the name to “example_com”. By inserting the following XML in ReadSoft.Connect.Host.exe.config, you can preserve the original name:
example.com
example.com

</FolderNameSubstitutions>
In the next example, the dot is changed to a dash instead of the default (underscrore).
</FolderNameSubstitutions>Register invoices in Visma Business
If the Target system service is enabled in ReadSoft Online and Visma Business is specified as a target system, you can use ReadSoft Online Connect to automatically register invoices with Visma Business. You can also use ReadSoft Online Connect to import the supplier registry from Visma Business to ReadSoft Online.
- If the configuration wizard cannot find a Visma Business installation on your computer, a dialog prompts you to specify the location of the integration DLL. If prompted to do so, specify the folder where Visma Business is installed, otherwise continue to the next step.
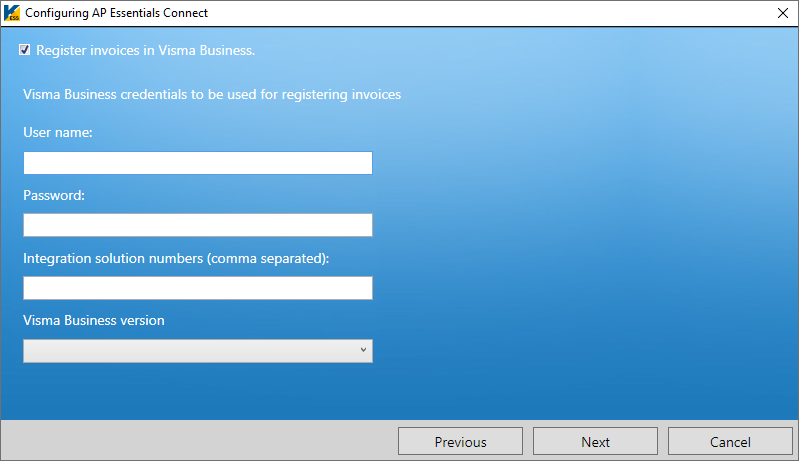
- Select
Register invoices in Visma
Business and specify a
User name and
Password that has
permission to register invoices in Visma Business. Use the
Integration solution
numbers box to specify solution numbers that match your Visma
Business license, and select your
Visma Business version.
-
Optionally specify whether you want to store a copy of the invoice image files locally in your network.
Use web page field for image – Specifies whether the WebPageLink field (in Visma Business) is used to specify the path to the invoice image. If you do not select this setting, the PictureFileName field is used.
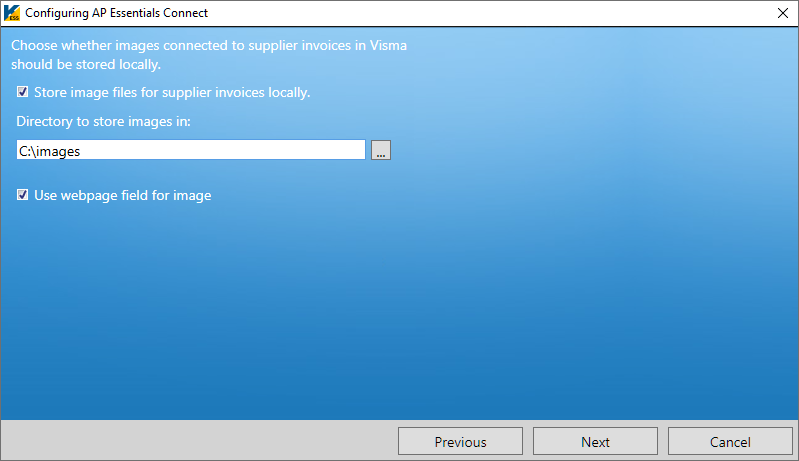
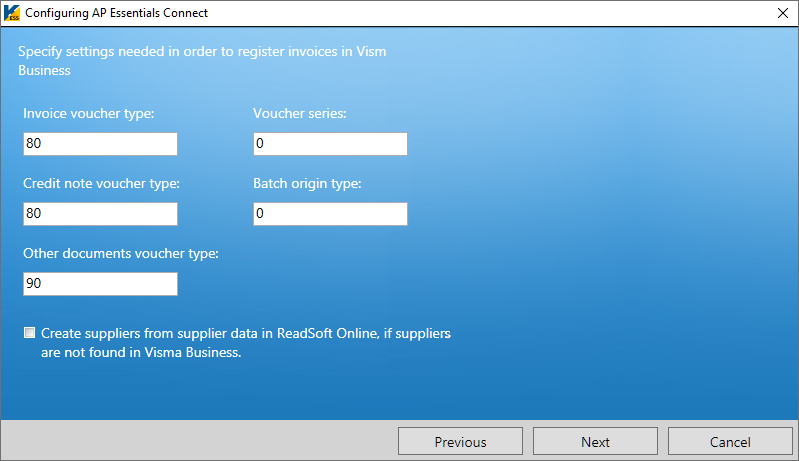
Note ReadSoft does not perform a backup of this folder. - Specify the settings required to register invoices in Visma
Business.
- Invoice voucher type – Specifies the voucher type used for invoices.
- Voucher series – Specifies a voucher series number for invoice batches. Usually, you specify a series that is designated for ReadSoft Online.
- Credit note voucher type – Specifies the voucher type used for credit notes.
- Batch origin type – Specifies the origin type of the batch.
- Other documents voucher type – Specifies the voucher type used for documents that do not match any of the other types.
- Create suppliers from supplier
data in
ReadSoft Online, if
suppliers are not found in Visma Business – Determines whether
suppliers created during verification are created in Visma Business. When this
setting is selected, if a supplier is created during verification in
ReadSoft Online,
and the supplier is not found in Visma Business when the invoice is posted,
then
ReadSoft Online
will create the supplier in Visma Business.
Note When creating a supplier during verification, you must provide at least the supplier name and supplier number.
- Specify the master-data that you want to synchronize with Visma
Business. Note that this is the preferred method to use for synchronizing
master data with Visma Business. Do not upload mater data using XML files, as
described in the next section, unless you need to upload field-value master
data.

- Suppliers, G/L Accounts, Currencies etc. – Specifies the master data that you want to synchronize.
- Update supplier coding suggestions – Determines whether the coding history for updated batches in Visma Business is used for automatic coding suggestions in ReadSoft Online.
- Update invoice coding in Storage – Determines whether coding is updated in ReadSoft Online Storage when the coding changes are made in updated batches in Visma Business.
- Org. unit 1, Org unit 2 etc. – specifies the organizational units (coding fields) that you want to use with ReadSoft Online. When you add coding fields to a workflow in ReadSoft Online, the Internal name must mach the Orig. field type name you specify here.
Master data
Master data is business information—such as supplier address information or other identifying information—that is used by multiple systems and applications. ReadSoft Online can utilize master data from an external system to provide information when processing invoices. For example, ReadSoft Online can use supplier master data to populate the Supplier list during verification.
If the Master data service is enabled, ReadSoft Online synchronizes master data with Visma Business, but you cannot upload master data from ReadSoft Online to Visma Business. ReadSoft Online Connect synchronizes master data from one Visma Business company at a time, every two minutes, but no company is synchronized more than once every twelve hours.
Sometimes master data synchronization can involve the transfer of large volumes of data. To reduce bandwidth, and maintain mater-data integrity, ReadSoft Online synchronizes master data.