Configure the SharePoint integration
Before you can use the SharePoint Online integration with Tungsten AP Essentials, you must:
-
Configure SharePoint Online.
-
Configure Tungsten AP Essentials for use with SharePoint Online.
Configure SharePoint Online
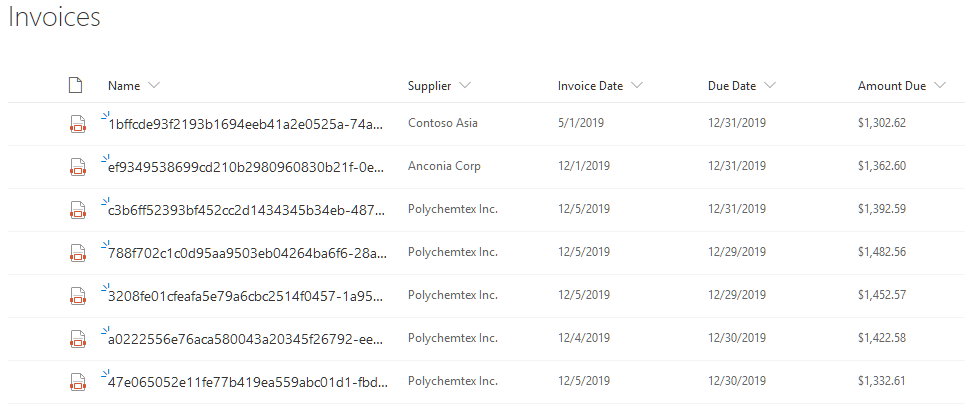
The SharePoint integration sends invoice images and extracted data from Tungsten AP Essentials to a document library in SharePoint Online. You create a column in the SharePoint document library for each field you want to display. For example, you create columns for the supplier name, invoice date, invoice due date, and total amount due. You do not need to create columns for the file name and file type because they are created by default.
- From the Libraries view in SharePoint, select New > Document library and use the dialog that appears to create a new document library.
-
From the newly-created document library view, use the Add column button to create new columns
for each extracted invoice field that you want to display. When you create a
column, you can choose a data type, such as Single line of text, Date, or Currency. For simplicity, you can choose Single line of text for all columns.
Optionally, you can choose a more appropriate data type, but for some
columns such as the Date type,
you must ensure your data is properly formatted as we demonstrate later.
Column names cannot contain special characters. Spaces are allowed, but must be removed when naming elements in the XSL transform as described later in this topic.
- Save your list view.
Configure Tungsten AP Essentials
After you create a document library in SharePoint:
- Create an XLS transformation (XSLT file) that maps extracted invoice information to the columns you defined in your SharePoint document library.
-
Specify the target system settings.
Create an XSL transformation
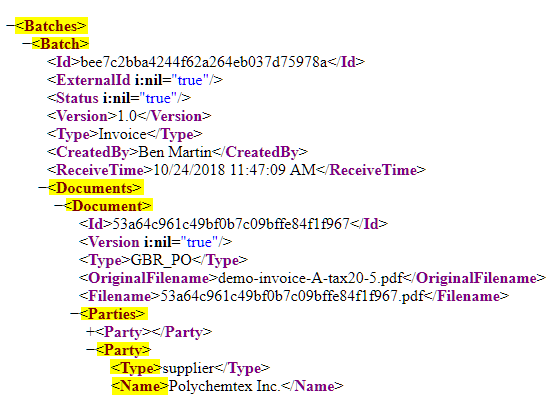
You can use XSL transforms to format data and map extracted invoice fields to columns in a SharePoint document library. You do this by using XPath to select the fields you want to include. In this procedure, we examine this example output from Tungsten AP Essentials and map the fields to columns in a SharePoint document library list view.
Assume you have a SharePoint document library with columns for Supplier, Invoice Date, Due Date, and Amount Due, and you want to map corresponding invoice fields to these columns. You can achieve this using this XSL transform:
<xsl:stylesheet xmlns:xsl="http://www.w3.org/1999/XSL/Transform" version="1.0" exclude-result-prefixes="">
  <xsl:output method="xml" indent="yes" />
  <xsl:template match="/">
    <SharePointDoc>
      <Supplier>
        <xsl:value-of select="/Batches/Batch/Documents/Document/Parties/Party[Type='supplier']/Name" />
      </Supplier>
      <InvoiceDate>
        <xsl:value-of select="/Batches/Batch/Documents/Document/HeaderFields/HeaderField[Type='invoicedate']/Text" />
      </InvoiceDate>
	  <DueDate>
        <xsl:value-of select="/Batches/Batch/Documents/Document/HeaderFields/HeaderField[Type='invoiceduedate']/Text" />
      </DueDate>
      <AmountDue>
        <xsl:value-of select="/Batches/Batch/Documents/Document/HeaderFields/HeaderField[Type='invoicetotalvatincludedamount']/Text" />
      </AmountDue>
    </SharePointDoc>
  </xsl:template>
</xsl:stylesheet>
In the XSL above, there is one container element for each column in SharePoint (<Supplier>, <InvoiceDate>, <DueDate>, and <AmountDue>). The element names mirror the column names with one exception: spaces are removed because spaces are not allowed in element names. Note line five. The <Supplier> element corresponds to the Supplier column in SharePoint. The contents of the <Supplier> element determine what value appears in the Supplier column in SharePoint. Logically, we want the supplier names of processed documents to appear in the Supplier column. Therefore, line six uses XPath to select the supplier name from Tungsten AP Essentials output. By looking at the example output, you can follow the XML hierarchy to see how the XPath selection on line six is derived.
Optional formatting
Date fields exported by Tungsten AP Essentials use the format YYYYMMDD, which is hard to read. You can optionally refine the XSL above, so date fields are easier to read.
<xsl:stylesheet xmlns:xsl="http://www.w3.org/1999/XSL/Transform" version="1.0" exclude-result-prefixes="">
  <xsl:output method="xml" indent="yes" />
  <xsl:template match="/">
	<xsl:variable name="rawInvoiceDate">
		<xsl:value-of select="/Batches/Batch/Documents/Document/HeaderFields/HeaderField[Type='invoicedate']/Text" />
	</xsl:variable>
	<xsl:variable name="rawDueDate">
		<xsl:value-of select="/Batches/Batch/Documents/Document/HeaderFields/HeaderField[Type='invoiceduedate']/Text" />
	</xsl:variable>
    <SharePointDoc>
      <Supplier>
        <xsl:value-of select="/Batches/Batch/Documents/Document/Parties/Party[Type='supplier']/Name" />
      </Supplier>
      <InvoiceDate>
	  <!-- Transform YYYYMMDD to MM/DD/YYYY -->
		<xsl:value-of select="substring($rawInvoiceDate, 5, 2)"/>
		<xsl:text>/</xsl:text>
		<xsl:value-of select="substring($rawInvoiceDate, 7, 2)"/>
		<xsl:text>/</xsl:text>
		<xsl:value-of select="substring($rawInvoiceDate, 1, 4)"/>
      </InvoiceDate>
	  <DueDate>
		<!-- Transform YYYYMMDD to MM/DD/YYYY -->
        <xsl:value-of select="substring($rawDueDate, 5, 2)"/>
		<xsl:text>/</xsl:text>
		<xsl:value-of select="substring($rawDueDate, 7, 2)"/>
		<xsl:text>/</xsl:text>
		<xsl:value-of select="substring($rawDueDate, 1, 4)"/>
      </DueDate>
      <AmountDue>
        <xsl:value-of select="/Batches/Batch/Documents/Document/HeaderFields/HeaderField[Type='invoicetotalvatincludedamount']/Text" />
      </AmountDue>
    </SharePointDoc>
  </xsl:template>
</xsl:stylesheet>
In the example above, the invoice date and invoice due date are assigned to variables, which are later pieced together using substring functions and slashes as separator characters. The result is dates in a more readable format, MM/DD/YYYY. The example above is simplistic to make it easy to understand. Advanced users are free to transform output in any way they see fit, using XSLT 1.0.
To use a custom XSL transform to map fields between Tungsten AP Essentials and SharePoint Online:
- Create an XSLT by copying one of the code examples above into a text file and saving it with the XSLT extension. Alternatively, create your own transformation.
- Upload the XSLT file to the Resources view on the partner level in Admin Center. You do not need to select the Trust button to trust the XSLT file.
- Specify the XSLT file in the target system settings as described in the next section.
Specify the target system settings
To specify the target system settings for SharePoint Online:
- Navigate to the Target system view of the customer account whose output you want to send to SharePoint Online.
- Select Edit and select the Configuration button for the SharePoint Online target system.
-
In the view that appears, specify
the Site URI. The URI is the
address of the SharePoint Online site without "default.aspx" at the end.
For example:
https://example.sharepoint.com/sites/invoices/
- Specify the User name and Password of a user who has permission to contribute to the SharePoint site.
- Use the List name setting to specify the name of the destination document library.
- Select Test to test your connection settings.
- In the XSL transformation box, select the XSLT file that you uploaded in the previous procedure.
-
Select OK to return to the
Target system view, and
select Save to save your
settings.
After you complete the procedures above and the rest of the customer setup, you are ready to begin processing invoices using the integration for SharePoint Online.