Example scenarios
This section contains scenarios that help you understand the API and the system settings required before performing an integration. The scenarios are covered in different integration samples that can be downloaded as part of the SDK package. This table shows the samples in which each capability is implemented, and points out the capabilities that are exposed in the Tungsten AP Essentials API.
| Services and capabilities | Scenarios | ||||||
|---|---|---|---|---|---|---|---|
| Authentication | Data capture | AP automation | |||||
| Upload documents | File-based integration | External data verification | Upload master data | Workflow integration | Lock and unlock a document | ||
| Operational management | | | |||||
| User management | | | |||||
| Customer account management | | ||||||
| User feedback | | ||||||
| Data extraction | | | | | |||
| Header field extraction | | | | | |||
| Line item extraction | | | |||||
| Auto-learning with external verification | | ||||||
| Document processing | | | | ||||
| Verification of header fields | | | | ||||
| Verification of line items | | ||||||
| Workflow | | ||||||
| Approval workflow | | ||||||
| Coding | | ||||||
| Preliminary post | | ||||||
| Final post | | ||||||
| Correction workflow | | ||||||
| Integration | | | | | |||
| File upload | | | |||||
| Document download | | | | ||||
| Master-data upload | | | |||||
| Storage | | ||||||
| Search | | ||||||
| File upload | | ||||||
Authentication
This scenario demonstrates how to authenticate a user in Tungsten AP Essentials. In addition to logging on, it also retrieves the current user (the user you are logged in with). The scenario uses the Authentication and Users API services.
Authentication tokens are saved in a cookie and expire after 30 minutes of inactivity. Therefore, your integration does not need to re-authenticate for every API operation. You only need to authenticate if your integration has not made a request for over 30 minutes.
- Ensure that a customer account has been created and that you have created an admin user.
-
Log in to AP Essentials using
the API code and ensure that the current user is retrieved.
const string ApiKey = "<enter your API key>";
const string ServiceUri = @"https://services.readsoftonline.com"; // European system
const string UserName = "<enter your username>";
const string Password = "<enter your password>";

// Authenticate
var config = ClientConfiguration.Create(Guid.Parse(ApiKey), new Uri(ServiceUri));
var authClient = new AuthenticationServiceClient(config);
var credentials = new AuthenticationCredentials
{
 AuthenticationType = AuthenticationType.SetCookie,
 UserName = UserName,
 Password = Password
 };
var authenticationResult = authClient.Authenticate(credentials);
if (authenticationResult.Status != AuthenticationStatus.Success)
{
 Console.WriteLine("Error logging in");
 return;
}
// Get current user info
var userClient = new UserServiceClient(config);
var user = userClient.GetCurrentUser();
Console.WriteLine("Hello {0}!", user.FullName);
Upload documents
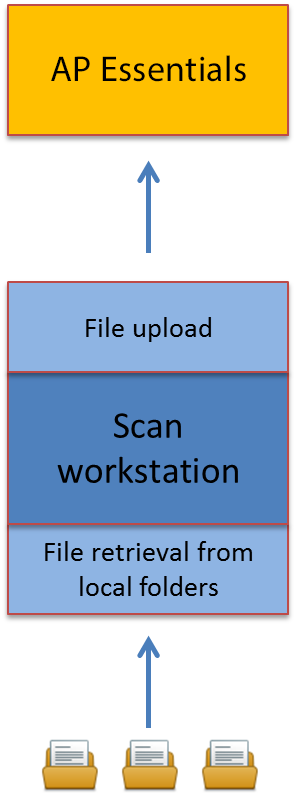
This scenario demonstrates how to upload documents to AP Essentials. A customer can use this scenario, for example, to upload scanned documents to AP Essentials. In this case, the integration is installed on a scanning workstation where the locally scanned documents are accessed.
The scenario uses the Authentication and Files API services.
- Ensure that a customer account has been created and that you have created a customer user.
-
Scan a document to a local folder.
Use the API code to upload a document to AP Essentials using a customer user login.
-
Log in to
AP Essentials
and check that a document has been uploaded properly.
// Upload a file (SelectedFilePath)
// Requires CurrentCustomer, SelectedBuyer and SelectedDocumentType to be set
ClientConfiguration config = Authenticate();
var stream = File.Open(SelectedFilePath, FileMode.Open, FileAccess.Read, FileShare.Read);
var fileClient = new FileServiceClient(config);
var result = fileClient.UploadImage2(
 Path.GetFileName(SelectedFilePath), CurrentCustomer.Id, String.Empty,
 SelectedBuyer.Id, SelectedDocumentType.SystemName,
 "OneDocumentPerFile", stream); // alternatively: "MultipleDocumentsPerFile"
if (result.Value)
 Console.WriteLine("File uploaded successfully!");
else
 Console.WriteLine("Error uploading image");
Note that the Files API service has multiple methods for uploading documents. The UploadImage3 method, for example, supports specifying header field values during document upload. This feature is helpful for specifying field values that do not already exist on the document, such as document priority or category fields. When specified, these field values remain unchanged during data extraction, allowing you to tag documents with additional context and streamline workflows.
When you specify a field value using the UploadImage3 method, you submit the field values through HTTP headers. You can specify up to ten header fields, including custom fields. Line-item fields are not allowed. Values containing non-ASCII characters, URL reserved characters, or %, must be URL-encoded.
You can specify the sender and sender number using the format below.
senderName: Value
senderNumber: Value
Specify all other fields using the format below.
rso-fieldtypeX: FieldTypeName
rso-fieldvalueX: Value
The example below sets field values for three standard header fields (SenderName, SenderNumber, InvoiceNumber ) and one custom field (InvoicePriority).
 public void UploadBatchesFromFolder(ClientConfiguration clientConfig, List<FolderMap> folderMaps)
 {
    // Upload batches to the current customer.

    var fileClient = new FileServiceClient(clientConfig);

    foreach (var folderMap in folderMaps)
    {
       UploadAllFilesInFolder(folderMap, fileClient);
    }
 }

 private void UploadAllFilesInFolder(FolderMap folderMap, FileServiceClient fileClient)
 {
    const string uploadSortingMethod = "OneDocumentPerFile";

    var files = Directory.GetFiles(folderMap.FolderPath);
    if (files.Length == 0)
       return;

    foreach (var filePath in files)
    {
       bool uploadedOk = false;
       string errorMessage = string.Empty;

       try
       {
          Logger.Log(string.Format("Uploading document {0}.", filePath));
          using (var stream = File.Open(filePath, FileMode.Open, FileAccess.Read, FileShare.Read))
          {
             string customPriotiy = "Urgent";
             var customHeaders = new Dictionary<string, string>();
             customHeaders["SenderName"] = "ACME";
             customHeaders["SenderNumber"] = HttpUtility.UrlEncode("140+5");
             customHeaders["RSO-FieldType1"] = "InvoiceNumber";
             customHeaders["RSO-FieldValue1"] = HttpUtility.UrlEncode("#777/25");
             customHeaders["RSO-FieldType2"] = "InvoicePriority";
             customHeaders["RSO-FieldValue2"] = customPriotiy;
             BoolValue result;
             result = fileClient.UploadImage3(
                Path.GetFileName(filePath), folderMap.CustomerId, String.Empty,
                string.Empty, folderMap.DocumentTypeInternalName,
                uploadSortingMethod, stream, null, customHeaders);

             uploadedOk = result.Value;
             if (!uploadedOk)
                errorMessage = "Error uploading file. Server response was 'False'";
          }
       }
       catch (ClientException ex)
       {
          errorMessage = "Error uploading file.\n" + ex;
          Logger.Log(errorMessage);
       }
    }
 }
File-based integration
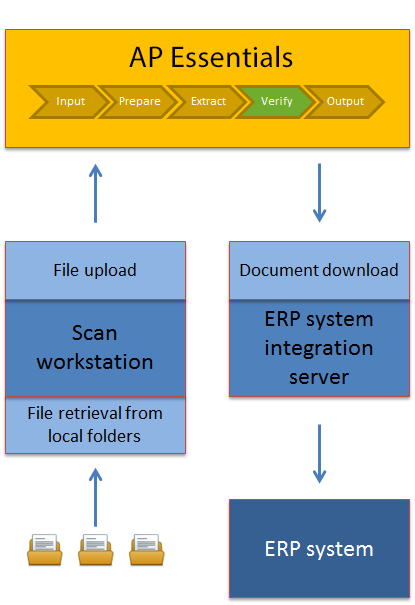
This scenario gives a basic understanding of how AP Essentials works with the data-capture process. Typically, a partner integrator uses AP Essentials to integrate with an on-premise solution that is installed locally at the customer site. This scenario uses the Authentication, Files and Documents API services.
File upload
AP Essentials works with batches to keep documents together, because files can contain multiple documents.
File uploading takes place at the scan workstation where documents are scanned to the local folders. The local folders are checked at regular intervals. If any files are found in the folders, they are uploaded to AP Essentials. After the file enters AP Essentials, a batch is created with one or more documents, and it is ready for interpretation and verification.
Document download
After a document has been verified by a user, the document is sent to the ERP system. This is handled by the ERP system integration server, where the integration software has been installed.
- Ensure that a customer account has been created and that you have created a customer user. You must also configure one document type with header fields that are configured in the Extraction service.
- Set the target system to API.
- Scan a document to a local folder.
- Use the API code to upload a document to AP Essentials using a customer user login.
- Log in to Tungsten AP Essentials Office and verify the document and its header-field information.
-
Use the API code to download the document (and send it to the ERP system you select).
public void DownloadOutputDocumentsReadyForExport(ClientConfiguration clientConfig)
{
 var client = new DocumentServiceClient(clientConfig);
 var documents = client.GetOutputDocumentsByCurrentCustomer();
 foreach (var docRef in documents)
 {
 if (docRef.OutputOperation == OutputOperationType.Export)
 {
 try
 {
 // Download image and xml
 DownloadOutputDocument(client, docRef);

 // Report document as downloaded
 client.DocumentStatus(docRef.DocumentId, new OutputResult{Status = OutputStatus.Success});
 }
 catch (Exception ex)
 {
 // Report error back to Online
 string errorMessage = string.Format("Error processing document: {0}", ex.Message);
 var rejectedInfo = new OutputResult
 { Status = OutputStatus.RejectDocument, Message = errorMessage };
 client.DocumentStatus(docRef.DocumentId, rejectedInfo);
 }
 }
 }
}
private static void DownloadOutputDocument(DocumentServiceClient docClient, DocumentReference docRef)
{
 string documentBasePath = Path.Combine(Settings.Default.DownloadFolder, docRef.DocumentId);
 string contentType = string.Empty;

 // Download image file
 var imageStream = docClient.GetDocumentOutputImage(docRef.DocumentId, response =>
 { contentType = response.ContentType; });

 using (imageStream)
 {
 string imageFileExtension = GetFileExtensionFromContentType(contentType);
 string imageFilePath = Path.ChangeExtension(documentBasePath, imageFileExtension);
 WriteStreamToFile(imageStream, imageFilePath);
 }

 // Download xml file
 var documentDataStream = docClient.GetDocumentOutputData(docRef.DocumentId,
 new MetaDataCollection(), response => { contentType = response.ContentType; });

 using (documentDataStream)
 {
 string documentDataExtension = GetFileExtensionFromContentType(contentType);
 string documentDataFilePath = Path.ChangeExtension(documentBasePath, documentDataExtension);

 WriteStreamToFile(documentDataStream, documentDataFilePath);
 }
}

private static string GetFileExtensionFromContentType(string contentType)
{ ... }
private static void WriteStreamToFile(Stream stream, string filePath)
{ ... }
External data verification
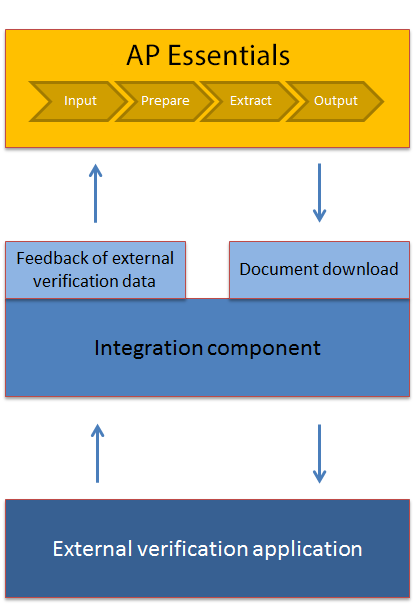
This scenario demonstrates how to integrate external data verification with AP Essentials. Normally, data verification is performed in Tungsten AP Essentials Office, where you can verify each field with help from the auto-complete functionality and draw on the image so the data is interpreted. AP Essentials also provides automatic learning functionality. After a document has been verified, the document template is relearned using feedback from the user. For example, if the user draws a field on the invoice, AP Essentials relearns the template using the new field location. This improves data capture performance the next time the same supplier invoice enters AP Essentials.
If verification is performed outside of AP Essentials, you can use the API to send validated data back to AP Essentials, so you do not lose the auto-learning benefits. You can do this by using a specific API method call in the Document API service, which is shown in this example.
This scenario uses the Authentication and Documents API service.
Feedback of external verification data
In this scenario, a partner is developing an external application that will be the only interface for the end users. The external application has a user interface that can create new customers and customer users. During document processing, the documents are sent to AP Essentials through email from the end customers or their suppliers. After the document is interpreted by AP Essentials, they are downloaded by the integration component and presented to the end user through the external application. The end user can see the document image and fill in fields where the interpreted data (if any) is present. After manual verification, the integration component takes the verified field values and sends them back to AP Essentials so the auto-learning step is triggered. The end user can also send user feedback.
- Ensure that a partner account has been created with an administrator user.
- Ensure the partner account has only one document type (with line items) selected and that this type is selected as the default document type.
- Ensure that API is the only target system enabled for the partner account.
- Enable the Process control service and select Never in the Data verification settings. This allows documents to bypass verification, because the scenario uses external verification.
- Create a customer using the integration component.
- Send a document to AP Essentials through email. After the file is uploaded, the file is prepared (by different image enhancements) and the field data is extracted.
- Use the API code to download a document and send it to the external verification application.
- Use the API code to verify the document in the external verification application and create user feedback.
- Use the API code to send the verified data to AP Essentials, so auto-learning process can take place. At the same time, send the external user feedback to AP Essentials in order to inform the system that interpretation enhancements must be performed.
-
To ensure that the auto-learning step was performed: Send another document (from the same
supplier) to AP Essentials
through email. Verify if the document interpretation was enhanced by the
feedback that was sent previously.
private void ApproveCurrentDocument()
{
 try
 {
 if (CurrentDocument == null)
 throw new Exception("No document downloaded");

 var docClient = new DocumentServiceClient(_authorizationManager.Configuration);

 // Update document with data from our UI
 //
 // You are allowed to change:
 // - Field values
 // - Field positions (If you have a UI that allows for users to
 // rubber-band new values)
 // - Supplier name
 //

 var doc = CurrentDocument.DocumentModel;

 var supplier = doc.GetSupplierParty();
 supplier.Name = CurrentDocument.SupplierName;

 var invoiceNumField = doc.GetHeaderField("invoicenumber");
 if (invoiceNumField != null)
 {
 invoiceNumField.Text = CurrentDocument.InvoiceNumber;
 invoiceNumField.Position = "0,0,0,0"; // left, top, width, height
 // (Tip: you can use the .net class RectangleConverter
 // (For example ConvertToInvariantString) to convert rects to strings and vice versa)
 }

 var amountField = doc.GetHeaderField("invoicetotalvatincludedamount");
 if (amountField != null)
 {
 amountField.Text = CurrentDocument.TotalAmount;
 amountField.Position = "0,0,0,0";
 }

 // Send document back for auto-learning purposes
 docClient.LearnDocument(doc.Id, doc);

 // Mark document as downloaded
 docClient.DocumentStatus(doc.Id, new OutputResult { Status = OutputStatus.Success });

 // Pass along to next system, e.g. an ERP system
 // ...

 UpdateUserMessage("Document approved");
 CurrentDocument = null;

 }
 catch (Exception ex)
 {
 UpdateUserMessage("Error approving document: " + ex.Message);
 }
}
Upload master data
This example shows how to upload master data. Two code samples are provided: one for uploading supplier master and one for uploading customer master data. The API services used in this scenario are Authentication, Documents and Master data.
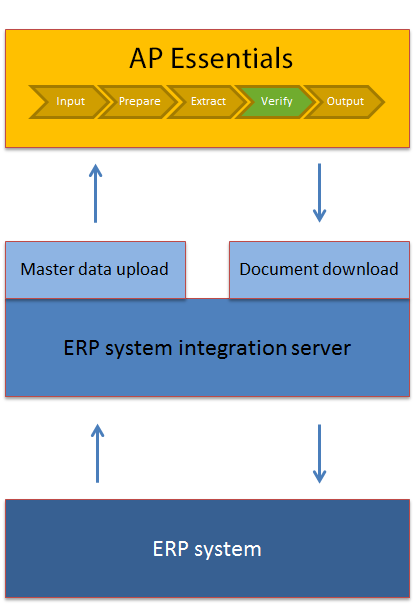
In this case, a partner integrator wants to implement autocomplete functionality by connecting fields to master data. During verification, the master data provides autocomplete functionality to connected fields. For example, when master data is connected to the supplier field or customer field, depending on which document process you use, users can easily select the correct supplier/customer from a list. Selecting values from a list is less prone to errors and more efficient than entering values manually. However, manually exporting master data from the ERP system and uploading it to AP Essentials on a regular basis can be tedious, so we will demonstrate how to automate this task using the API.
Master data upload
Master data is retrieved from the ERP system and uploaded to AP Essentials, where it is available during verification. Typically, the integration software runs on the integration server and synchronizes the master-data once or twice per day. This limits the load on the ERP system but still offers the data to be available reasonably fast.
- Ensure that a customer account has been created and that you have created a user. You must also configure one document type with header fields connected to master data (configured in the Extraction service).
- Set the target system to API and ensure that the Master data service is activated.
- Use the API code to synchronize the master data, so all available suppliers/customers are uploaded to AP Essentials.
- Send or upload a document to AP Essentials.
-
Verify the document. Ensure that the imported suppliers/customers are available for
selection during verification.
Code example: Uploading supplier master data
This code example demonstrates how to upload supplier master data to AP Essentials.
public void UploadMasterData(ClientConfiguration clientConfig)
{
 var accountClient = new AccountServiceClient(clientConfig);
 var currentCustomer = accountClient.GetCurrentCustomer();

 // If IsMasterDataOnCustomerLevel is set, this customer has buyers but wants
 // to manage master data on the customer level. In other words, share
 // master data between buyers. In that case, we upload directly to the customer.
 // If IsMasterDataOnCustomerLevel is not set and the customer has buyers, we
 // upload data to specific buyers.

 var userConfig = accountClient.GetUserConfiguration(currentCustomer.Id);
 var buyers = accountClient.GetCurrentUserBuyers();
 bool hasBuyers = (buyers.Count > 1 || (buyers.Count == 1 && buyers.First().Id != currentCustomer.Id));
 bool uploadToBuyers = !userConfig.IsMasterDataOnCustomerLevel && hasBuyers;

 var masterDataClient = new MasterDataServiceClient(clientConfig);

 if (uploadToBuyers)
 {
 foreach (var buyer in buyers)
 UploadMasterDataToOrganization(buyer.Id,
 buyer.ExternalId,
 masterDataClient);
 }
 else
 {
 UploadMasterDataToOrganization(currentCustomer.Id,
 currentCustomer.ExternalId,
 masterDataClient);
 }
}

private void UploadMasterDataToOrganization(string organizationId, string erpClientId, MasterDataServiceClient masterDataClient)
{
 var erpClient = new FakeERPClient.ErpClient(erpClientId);

 var erpSuppliers = erpClient.GetAllSuppliers();
 var onlineSuppliers = from erpSupplier in erpSuppliers select ToOnlineSupplier(erpSupplier);
 masterDataClient.SetSuppliers(organizationId, new SupplierCollection(onlineSuppliers));
}

private Supplier ToOnlineSupplier(FakeERPClient.Supplier erpSupplier)
{
 return new Supplier
 {
 SupplierNumber = erpSupplier.Number,
 Name = erpSupplier.Name
 };
}
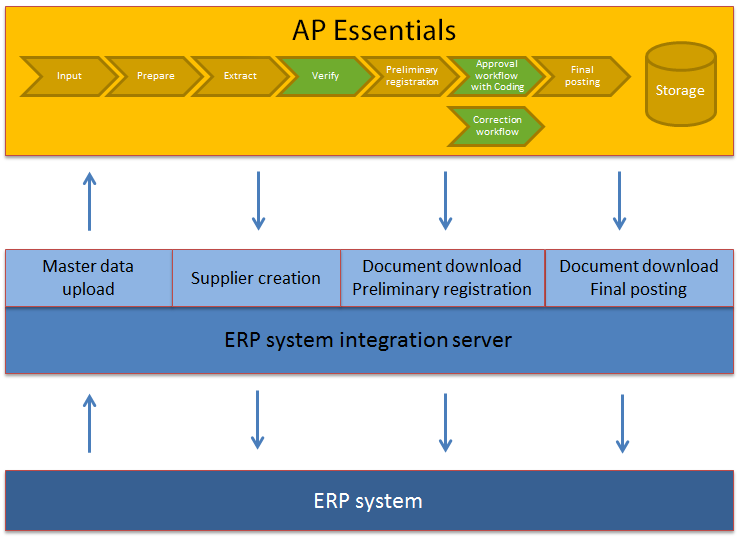
Workflow integration
This scenario describes how to coordinate the Workflow service with an ERP integration. This scenario applies if a partner wants to integrate with the ERP system with the AP Essentials workflow service, so they can offer a solution to their customers to handle their approval workflows. In this case, AP Essentials supports a two-step procedure for transferring data to the ERP system:
- The registration step, where a preliminary registration of the document takes place in the ERP system. This occurs directly after data verification.
- The final posting step, where the data can be updated with any corrections that have taken place during the approval workflow steps.
Two-step integration
The same document downloading methods are used in the API as previous examples. The difference between the two steps is the status of the document. During the first step, the document has the status, register, while in the second step, the document has the status, post.
Storage
This scenario also uses AP Essentials Storage, where the documents are stored. The main benefit is having AP Essentials store all processing information, such as data and history, in one place, together with the document image. This is useful for customers that do not have access to the ERP system, but still want to have one place to store their documents. Storage also has support for file uploading, with or without a connection to existing documents.
- Ensure that a customer account has been created and that you have created a user. You must also configure one document type with header fields that are configured in the Extraction service.
-
Enable the
Workflow
service and create at least one workflow, and enable the
Storage
service. Let the user have the approval admin role and set the privileges to access the Manage and Storage views.
Send or upload a document to AP Essentials and verify the document. Ensure you select a supplier that has been uploaded to AP Essentials as master data.
-
Use the API code to download a document with registration status and do a preliminary posting (registration) to the
fake ERP system.
Approve the invoice in the approval workflow.
- Use the API code to download a document the second time; this time with the post status. Do a final posting (post) of the document to the fake ERP system.
- Verify that the voucher has been created properly in the fake ERP system.
- Locate the document in AP Essentials Storage.
-
Try to upload a file as an attachment to the existing document.
try
{
 if (documentReference.OutputOperation == OutputOperationType.Register)
 {
 // "Register" document
 var regResult = RegisterInvoice(documentServiceClient, documentReference);

 // Report registration result
 documentServiceClient.DocumentStatus(documentReference.DocumentId, regResult);
 }
 else if (documentReference.OutputOperation == OutputOperationType.Post)
 {
 // Download image
 string localImageTempPath = DownloadImage(documentServiceClient, documentReference);

 // Post Voucher to ERP system based on the document data
 string voucherId = CreateVoucher(documentServiceClient,
 documentReference,
 localImageTempPath);

 // Report document as posted
 string message = string.Format("Voucher {0} posted successfully in FakeERP.", voucherId);
 documentServiceClient.DocumentStatus(documentReference.DocumentId, new OutputResult
 {
 Status = OutputStatus.Success,
 Message = message
 });
 }
}
catch (Exception ex)
{
 string errorMessage = string.Format("Error processing document: {0}", ex.Message);
 var rejectedInfo = new OutputResult
 {
 Status = OutputStatus.RejectDocument,
 Message = errorMessage
 };

 documentServiceClient.DocumentStatus(documentReference.DocumentId, rejectedInfo);
}
Lock and unlock a document for external processing
This scenario demonstrates how to lock and unlock a document. An organization uses a custom validation application to perform additional checks on invoices before they are approved for processing.
When an invoice requires validation, the application retrieves the document ID from the workflow and locks the document to prevent other users or integrations from modifying it simultaneously. The application then performs the required checks, such as validating supplier information or matching invoice data against an external system.
After processing is complete, the application unlocks the document so that it can continue through the workflow.
Locking documents helps prevent concurrent updates and ensures data consistency when multiple users or integrations access the same document.
// Create the client configuration using the API key and service URL.
var config = ClientConfiguration.Create(
    Guid.Parse(ApiKey),
    new Uri(ServiceUri));

// Create the Workflow service client.
var workflowClient = new WorkflowServiceClient(config);

Console.WriteLine($"Attempting to lock document: {DocumentId}");

// Lock the document to prevent concurrent updates.
var lockResult = workflowClient.LockDocument(DocumentId);

if (lockResult.Value)
{
    Console.WriteLine("Document locked successfully.");

    try
    {
        // Perform custom processing while the document is locked.
        // For example:
        // - Validate supplier information
        // - Match invoice data against an ERP system
        // - Update document metadata
    }
    finally
    {
        Console.WriteLine($"Attempting to unlock document: {DocumentId}");

        // Release the lock so the document can continue
        // through the workflow.
        var unlockResult = workflowClient.UnlockDocument(DocumentId);

        if (unlockResult.Value)
        {
            Console.WriteLine("Document unlocked successfully.");
        }
        else
        {
            Console.WriteLine("Failed to unlock the document.");
        }
    }
}
else
{
    Console.WriteLine("Failed to lock the document.");
}