Use field lists from NetSuite in Tungsten AP Essentials
When you configure the NetSuite target system service, you use custom field mapping settings to match NetSuite fields with Tungsten AP Essentials fields. Normally, this is a one-way operation, where you use data templates to specify the field values that you want to send to NetSuite. This topic, however, describes a more interactive approach that lets you import lists from NetSuite, and display the list for selection during verification.
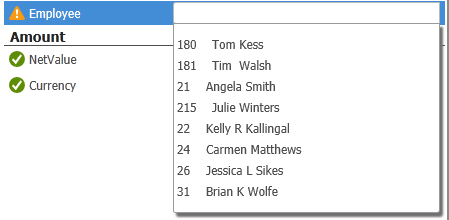
To demonstrate this concept, assume you have a NetSuite Transaction Body Field of type List/Record. The field contains a list of employees that you want to appear in the "Employee" field during verification along with the other invoice fields. When a verification user selects the appropriate employee from the list, the value is sent to NetSuite, along with the other field values and invoice data.
Display a list field in Tungsten AP Essentials and map its value to NetSuite
To display a list field in Tungsten AP Essentials and map its value to NetSuite:
-
In NetSuite, create or locate a Transaction
Body Field of type List/Record and make a note of the field ID. You need the
field ID for other settings in Tungsten AP Essentials.
Although we use a Transaction Body
Field in this example, Transaction Column Fields (expenses and items) are also
supported, each with its own setting in the target system settings.

Note that the field can be a custom field configuration that is filtered to your liking. For example, you can filter the list to include only employees of a particular department.

-
In the Target
system configuration settings, specify the
NetSuite field ID from the previous step in the List field
IDs setting.
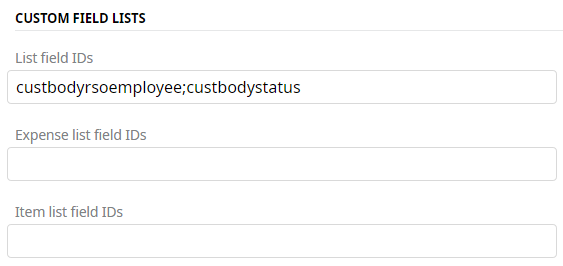
In this example, two NetSuite field IDs are specified (separated by a semicolon).
Do not confuse this setting with the Custom field mapping setting that is in the same view. - Select OK and save the target-system settings. The list field is uploaded as master data.
-
In the Extraction service settings, add a custom field and specify the
NetSuite field ID from the previous steps as the Type
name. The Type
name setting connects the field to the NetSuite field.
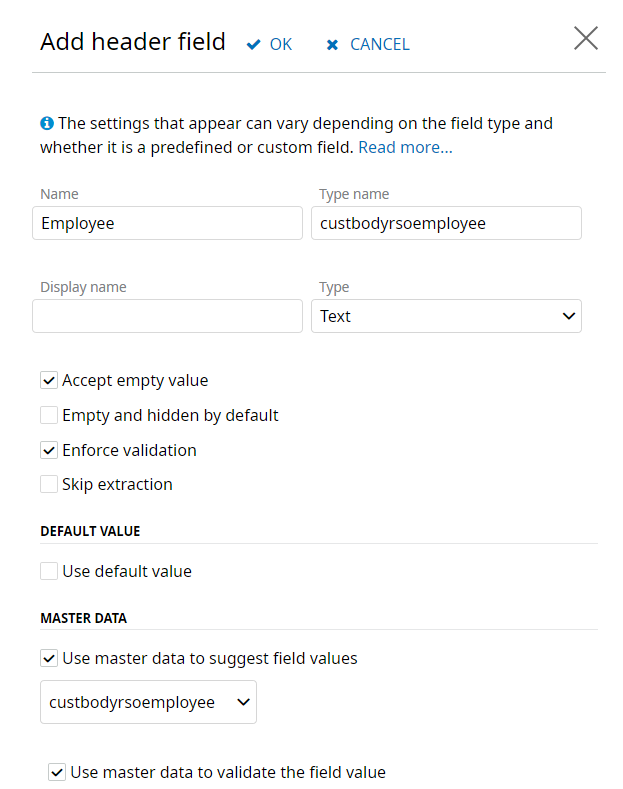
- Specify the Name of the field as it should appear in the output data.
- Select Use master data to suggest field values and Use master data to validate the field value.
- Select OK and save the document type.
-
Return to the Target
system configuration settings, and use the
NetSuite field ID from the previous steps to create a data template in the Custom fields setting under the
NetSuite heading.
Do not confuse this setting with the Custom fields setting that is under the NetSuite CustomFields Values heading.
In this example, the NetSuite field ID is "custbodyrsoemployee" and its value will be determined by the custom field that you created in the previous step. It is only a part of the data template, which contains other fields:
custbodyrsoemployee="%custbodyrsoemployee%";custbodypark="true";custbodyapprovedby="%@user60%";custbodyapproved="%@date60%"
- Select OK and save the target-system settings. The list field is now integrated with AP Essentials, and it is available during verification. When a verification user selects a value from the list, it is sent to NetSuite, along with the other field values and invoice data.